Auto CI Setup
Manually building and deploying every time you push code is tedious and error-prone. With Auto CI, builds and deployments start automatically the moment you push code to GitLab or GitHub. Set it up once, and you can focus entirely on development.
Why Read This Guide
By following this guide once, you can configure KIOPS to automatically build images and run security checks every time a developer pushes code to Git. Even if you are on the operations team and have never registered a Webhook before, this walkthrough explains every step — "Copy URL → Paste into Git repository" — so you can turn on the automation pipeline. Expect time savings, fewer human errors, consistent build/deploy behavior, and immediate feedback right after a push.
Before You Start: Terms to Know
Before diving in, here is a one-line definition for each term that appears repeatedly. When a term first shows up in the body, you will see a "(See: Glossary)" pointer.
| Term | Definition + everyday analogy |
|---|---|
| Webhook | A way to notify a specific URL when a certain event happens. Like getting a phone notification when a delivery arrives — automatic. |
| Push event | The moment a developer pushes a commit to a Git branch. Like a new email arriving in your inbox. |
| MR (Merge Request) | A request to merge code into another branch in GitLab (same as Pull Request in GitHub). Like submitting an agenda item for review at a meeting. |
| Auto CI | KIOPS's feature that automatically runs builds in response to Git events. Like an automatic car wash — drive in (code), the wash (build) runs by itself. |
| Build profile | A preset that determines the CPU/memory size assigned to the build Pod (small to 4x-large). Like delivery box sizes — bigger cargo (project) needs a bigger box. |
| Registry Secret | The credentials Kubernetes uses to log into a private registry (Harbor, etc.). Like a locker key — Kubernetes uses it to pull the image out. |
Overview
Auto CI detects GitLab/GitHub Webhook events and automatically runs the build pipeline. Here's the complete flow:
graph LR
    A[Git Push] --> B[Webhook Trigger]
    B --> C[KIOPS Build Start]
    C --> D[BuildKit Build]
    D --> E[Harbor Push]
    E --> F[Auto Deploy]
Supported Events
The GitLab Webhook handler only triggers builds for the three event types below. When Auto CI is enabled, the service reacts to all three events (there is no per-event toggle UI). All Auto CI builds run inside the fixed kiwi-builds namespace of the K8s cluster.
- Push: Triggered when a commit is pushed to a branch. Use for development branch auto-build and continuous integration.
- Merge Request: Triggered when an MR is created or updated. Use for build verification before code review.
- Tag: Triggered when a tag is created. Use for release version builds.
Prerequisites
The following conditions must be met before setting up Auto CI:
If any of the items below are missing, the Auto CI button will be disabled. Complete all items first.
- Service registered (required): Service must be registered on the [Service Management] page
- GitLab/GitHub token configured (required): Tokens that the administrator registered in the organization settings are used automatically. You do not need to enter a token again when registering a service.
- Registry configured (required): Harbor/DockerHub registry information must be entered in service settings.
- Dockerfile present (recommended): If not available, auto-generate with Build Wizard
- K8s cluster connected (required for auto-deploy): Cluster must be registered in [Runtime Environment]
If the Auto CI button appears grayed out, check the service detail page for missing settings. Usually it's the Git token or Registry settings that are missing.
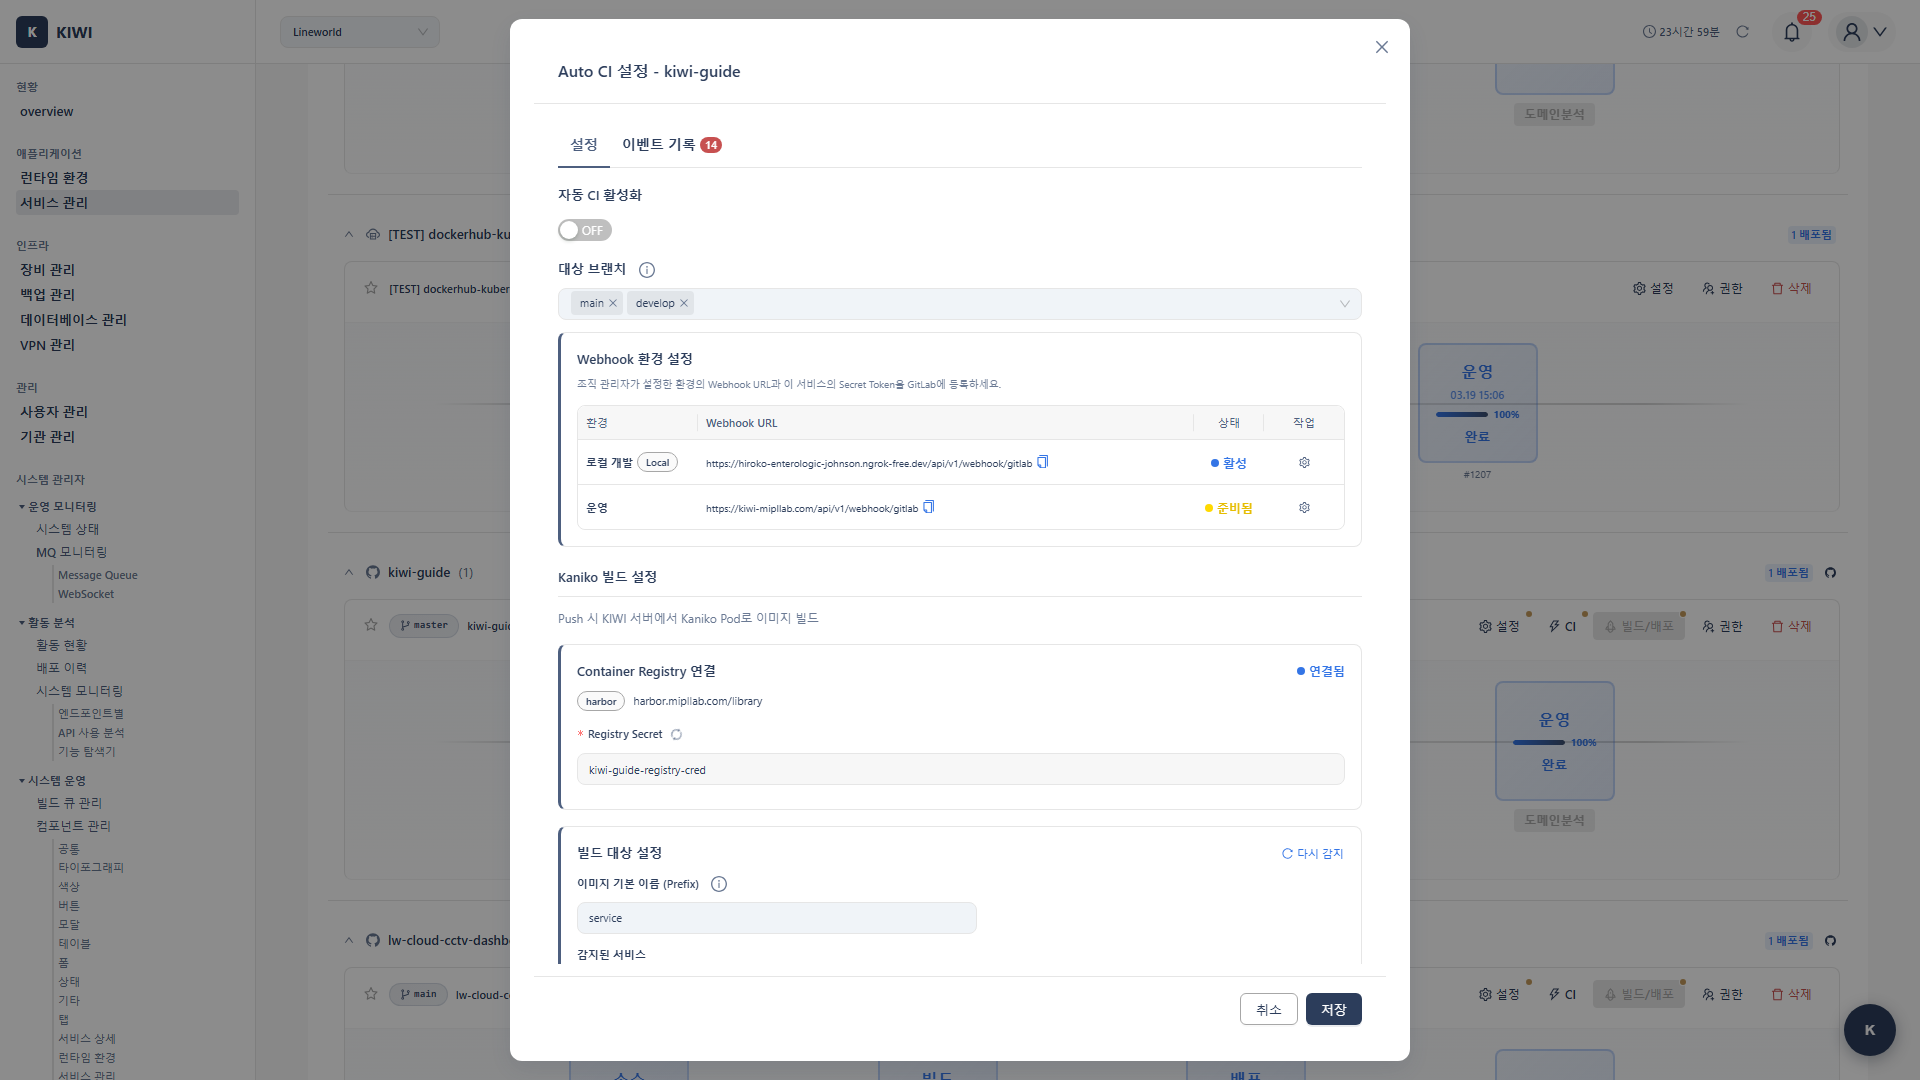
Step 1: Open the Auto CI Settings Modal
1.1 Access from Service List
- Navigate to the [Service Management] page (
/services) - Find the service to configure Auto CI for
- Click the Lightning icon (Auto CI) button at the top right of the service card (hover to see the "Auto CI" tooltip).
1.2 Access from Pipeline View
You can also access it from the 4-stage pipeline displayed on the service card:
- Source: Click to check Git integration status.
- Build: Click to open build settings and Auto CI modal.
- Deploy: Click to view deployment settings.
- Operate: Click to monitor deployed service.
Click the Build stage in the pipeline to access build-related settings.
Step 2: Basic Settings (Settings Tab)
When the Auto CI modal opens, the basic settings tab is displayed. This is where you configure the core Auto CI options.
2.1 Enable Auto CI
-
Enable Auto CI: Toggle switch to turn the Auto CI feature on/off
- Recommended: ON (activate right after initial setup)
-
Git Branch: Select the branch to detect Webhooks on
- Development environment:
developbranch recommended. - Production environment:
mainormasterbranch recommended.
- Development environment:
Selecting all branches (*) will trigger builds on every feature branch push, which can waste resources. Choose specific branches when possible.
2.2 Registry Information Check
Registry information entered during service registration is automatically displayed. This is where your built images will be stored.
- Registry URL: Registry address where images are stored (e.g.,
harbor.mipllab.com) - Registry Type: Type of registry (Harbor or Docker Hub)
- Project/Namespace: Image storage location (e.g.,
library,myproject) - Image Name: Name of the image to build (default: same as service name)
- Image Prefix (for monorepos, optional): Prefix prepended to each image name when building multiple sub-projects in a monorepo. Example: prefix
kiwi-+ sub-projectbackend→kiwi-backend
If registry information is not displayed, click the service card to go to the detail page and complete Registry Settings first.
2.3 Build Profile
Select the resource size allocated to the build Pod. Choosing the right profile for your project size helps optimize build time and resource usage. (See: Build profile)
- auto (default): Selected automatically based on project detection results.
- small: For small static sites or simple script builds.
- medium: For typical Node.js/Python/Go API builds.
- large: For large frontends or a single service in a monorepo.
- extra-large / 2x-large / 4x-large: For large monorepos or heavy Java/native builds.
Start with auto. If the build fails with OOM or takes too long, bump the profile up one step and retry.
The security gate options that used to live in the Auto CI modal (Auto SAST / Security Gate / Block on Critical·High) have been removed. Instead of a SAST-only block at the build stage, you now configure deployment-blocking policy on the Security Gate tab of [Security Analysis] (OPA policy based), which makes a combined decision across the 8 areas (SAST/SCA/DAST/SBOM/IaC/Secrets).
Step 3: Detect Build Target Services
KIOPS analyzes your Git repository and automatically detects project information. This step helps identify Dockerfile locations and project structure.
3.1 Auto-detect Project Type
- Click the Detect Services button.
- KIOPS analyzes the Git repository and automatically detects project information (usually takes a few seconds). Build methods differ by project type (Node.js uses
npm install, Python usespip install, etc.), so KIOPS identifies them and suggests optimal build settings.
3.2 Detection Result Fields
When detection is complete, the following information is displayed:
- Language: Programming language used (e.g., Node.js, Java, Python, Go).
- Framework: Framework used (e.g., React, Spring Boot, Django).
- Package Manager: Package management tool (e.g., npm, yarn, Maven, pip).
- Build Type: Repository structure (Single-repo or Mono-repo).
- TypeScript: Whether TypeScript is used (Yes or No).
- Dockerfile: Dockerfile location (e.g.,
./Dockerfile,./docker/Dockerfile).
3.3 Handling Monorepo Projects
For monorepo projects (multiple projects like frontend/backend living in a single Git repository), multiple services are detected:
- A table of detected sub-project list is displayed.
- Select sub-projects to build using checkboxes
- Verify/modify the Dockerfile path for each project
Typical monorepo structure example:
my-project/
├── frontend/         → Image: my-project-frontend
│   └── Dockerfile
├── backend/          → Image: my-project-backend
│   └── Dockerfile
└── api-gateway/      → Image: my-project-gateway
    └── Dockerfile
Builds run in parallel for each selected sub-project. In resource-constrained environments, adjust the number of projects to build at once.
Step 4: Automatic Registry Secret Creation
To pull images from a Private Registry (e.g., Harbor) in Kubernetes, authentication credentials are required. KIOPS automatically creates the necessary Registry Secret when you save the Auto CI settings (there is no separate creation button). (See: Registry Secret)
If you proceed to Step 5 (Webhook registration) without saving Auto CI first, the Registry Secret is never created. Builds may still succeed but K8s deployment fails with ImagePullBackOff. Always click Save in Step 6 first to generate the Secret, and only then register the Webhook.
Auto-created Secret information:
- Secret name:
{serviceName}-registry-cred - Namespace: Service deployment namespace (default: service name)
- Type:
kubernetes.io/dockerconfigjson - Contents: Registry credentials (username, password)
4.1 When Registry Password Changes
If the registry password has changed or you need to refresh the Secret:
- Delete the existing Secret from the K8s cluster.
- Save the Auto CI modal again and a new Secret will be generated.
If you see ImagePullBackOff or permission errors during build/deploy, verify:
- Is the K8s cluster connection working?
- Do you have Secret creation permissions (RBAC) for that namespace?
- Does the namespace exist?
If it's a permission issue, request create permission for secrets resources from the cluster administrator.
Step 5: Webhook URL and Secret Token Setup
In this step, you'll configure the Webhook so that GitLab/GitHub can send events to KIOPS. When code is pushed to your Git repository, a notification is delivered to the KIOPS Webhook URL and the build starts automatically. (See: Webhook, Push event)
If you type the URL by hand instead of clicking Copy URL in KIOPS, you can easily drop the trailing path (such as /api/v1/webhook/gitlab) or mistype the domain. If the test in the Git repository returns "404 Not Found", copy the URL again. Always rely on the Copy button to be safe.
5.1 Webhook URLs by Environment
Regular users see only the Production Webhook URL. Platform admins additionally see a Local URL (for development debugging). In normal usage, only the Production URL is needed.
- Production: Production KIOPS backend URL. Example:
https://kiwi.example.com/api/v1/webhook/gitlab - Local (admin only): URL exposed from a local development environment via an external tunnel such as ngrok.
5.2 Copy Webhook URL
- Find the environment you want to use (usually Production) in the Webhook Environments section.
- Click the Copy URL button to copy the Webhook URL
- Click the Copy Token button to copy the Secret Token as well
5.3 Register Webhook in GitLab
Now register the copied information in your GitLab project.
Step-by-step guide:
-
Go to your GitLab project page
-
Click Settings → Webhooks in the left menu
-
Enter the following information:
- URL: Webhook URL copied from KIOPS
- Secret token: Secret Token copied from KIOPS
-
In the Trigger section, select events:
- Push events (required)
- Merge request events (recommended)
- Tag push events (for release builds)
-
SSL verification: Check Enable SSL verification (recommended)
-
Click the Add webhook button.
5.4 Register Webhook in GitHub
For a GitHub repository:
- GitHub repository → Settings → Webhooks → Add webhook
- Payload URL: enter the KIOPS Webhook URL
- Content type: select
application/json - Secret: enter the KIOPS Secret Token
- Which events would you like to trigger this webhook?:
- Choose Just the push event (recommended). KIOPS's GitHub webhook handler only processes
pushevents; Pull request / Release and other events are ignored with "Event type is not processed". - Unlike GitLab, GitHub uses only push events to trigger automatic builds in KIOPS.
- Choose Just the push event (recommended). KIOPS's GitHub webhook handler only processes
- Click Add webhook
KIOPS's GitHub Webhook handler only triggers automatic builds on push events. GitLab Webhooks respond to all three event types (Push/MR/Tag), but GitHub only uses Push events (see MR (Merge Request)). Other event types such as Pull request and Release are ignored, so there is no need to enable them. If you need a build at the PR stage, either push the PR branch under a temporary name (e.g., pr-build) to trigger a build, or use a separate tool such as GitHub Actions.
The Secret Token is unique per service, and if exposed, malicious build triggers can occur. Never expose it in public repositories or documentation.
After registering the Webhook in your Git provider, click the Test button to verify connectivity. A "Hook executed successfully" message or a 200 OK response indicates success.
Step 6: Save Settings and Test
Once configuration is complete, let's save and test. Testing ensures all connections are working properly.
6.1 Save Settings
- Review all settings.
- Click the Save button.
- Verify the "Auto CI settings have been saved" message. The Registry Secret is also created automatically on save.
6.2 Test Webhook
Before pushing actual code, verify the connection using your Git provider's test feature:
- Git repository → Settings → Webhooks
- Find the registered Webhook entry.
- Click the Test dropdown button.
- Select Push events
- Hook executed successfully: HTTP 200 - Connection is working.
- HTTP 401/403 - Secret Token mismatch or permission issue
- Connection failed - Cannot access KIOPS server (check firewall, URL errors)
6.3 Verify Build in KIOPS
After sending the test event, verify in KIOPS:
- Navigate to the [Service Management] page
- Check if the Build stage in the service pipeline shows "Building" status.
- Click to verify the "Triggered by Webhook" message in the build log
6.4 Monitor Build Progress
Once the build starts, you can monitor progress in real time:
- Progress Bar: Shows build progress from 0 to 100%.
- Current Step: Shows the currently running stage (Clone, Build, Push, etc.).
- Build Log: Displays real-time build log with terminal output.
- Duration: Shows build elapsed time.
The first build may take longer because there's no image cache. From the second build onwards, builds complete much faster thanks to cache reuse.
Real-world Usage Scenarios
Here are Auto CI configuration examples for various team workflows. Refer to the scenario that matches your situation.
Scenario 1: Development Branch Auto Build/Deploy
Situation: Developers want code pushed to the develop branch to be automatically deployed to the dev server for immediate verification.
Configuration:
- Auto CI: Enabled
- Git Branch:
develop - Build Profile: auto or medium
Result: Pushing to develop branch automatically builds and deploys to development environment.
Scenario 2: Release Tag Build
Situation: You want to build production images only when creating release tags like v1.0.0, and deploy manually.
Configuration:
- Auto CI: Enabled
- Git Branch:
main
Result: Running git tag v1.0.0 && git push --tags automatically builds, and deployment is done separately. If you need to block deployment, configure the policy on the Security Gate tab of [Security Analysis].
Scenario 3: MR Validation Build
Situation: You want to automatically verify that builds succeed before code review.
Configuration:
- Auto CI: Enabled
Result: Builds run automatically when MRs are created/updated. Run post-build security checks such as SAST/SCA from the [Security Analysis] page.
In practice, many teams combine Scenario 1 (development environment) and Scenario 2 (production environment): development is automatic, production is handled carefully.
Troubleshooting
If you encounter issues during Auto CI setup or builds, refer to the guide below.
Webhook Not Triggering
- "Connection refused" in Git test: Cannot access KIOPS server. Check firewall settings and verify KIOPS server status.
- "HTTP 401/403" in Git test: Secret Token mismatch. Copy token again from KIOPS and re-register in your Git provider.
- Test succeeded but no build: Branch filter issue. Verify the pushed branch matches Auto CI branch settings.
Check Recent Deliveries in GitLab's Settings → Webhooks, or in the GitHub Webhook Recent Deliveries tab, to see the request/response content of each Webhook call.
Registry Secret Errors
- "Permission denied": Insufficient K8s permissions. Request secrets resource create permission from cluster admin.
- "Namespace not found": Namespace doesn't exist. Create the namespace first or select a different namespace.
Build Failure
- "Dockerfile not found": No Dockerfile in the repository. Generate a Dockerfile with Build Wizard.
- "Build timeout": Build time exceeded the limit. Move up to a larger build profile or optimize the Dockerfile.
- "Registry authentication failed": Registry auth failed. Re-verify registry credentials (username/password).
- "Git clone failed": Git access failed. Verify the GitLab/GitHub token registered for the organization has
read_repositorypermission.
Build Stuck in Pending
- Cause: Reached concurrent build limit or insufficient build workers.
- Solution: Wait for previous builds to complete, or cancel unnecessary builds.
- Note: If building status persists for more than 5 minutes, it will automatically be marked as failed.
- When builds repeatedly timeout (even after moving to a larger build profile)
- When Registry Secret permission issues aren't resolved.
- When Webhook URL is not accessible from external networks.
What's Next
Once Auto CI is configured and the Webhook is registered, the recommended next steps are:
- Push test: First, push a small change (such as a one-line README edit) to confirm the Webhook fires. Seeing "Triggered by Webhook" in the KIOPS build log means it works.
- Configure the security gate: Once builds run reliably, set a policy on the Security Gate tab of [Security Analysis] (OPA, combined across the 8 areas) so images with high-severity vulnerabilities cannot be deployed.
- Automate deployment: If you also want automatic deployment after the build, follow the K8s Deployment or Docker Deployment guide to set up the deploy environment.
Related Guides
- Build Wizard - Automatic Dockerfile generation.
- Manual Build - Trigger builds directly.
- K8s Deployment - Kubernetes deployment settings.
- Docker Deployment - Docker environment deployment.
Reference: Build System Architecture
                    ┌─────────────┐
                    │  GitLab /   │
                    │   GitHub    │
                    └──────┬──────┘
                           │ Webhook (Push/MR/Tag)
                           ▼
                    ┌─────────────┐
                    │    KIOPS     │
                    │   Backend   │
                    └──────┬──────┘
                           │ Build Queue
                           ▼
┌─────────────────────────────────────────────┐
│        Build Queue Worker (kiwi-builds)     │
│  ┌─────────┐  ┌─────────┐  ┌─────────┐     │
│  │ Build 1 │  │ Build 2 │  │ Build 3 │ ... │
│  └────┬────┘  └────┬────┘  └────┬────┘     │
└───────┼────────────┼────────────┼──────────┘
        │            │            │
        ▼            ▼            ▼
┌─────────────────────────────────────────────┐
│           Kubernetes Cluster                │
│  ┌──────────┐ ┌──────────┐ ┌──────────┐    │
│  │ BuildKit │ │ BuildKit │ │ BuildKit │    │
│  │  Pod 1   │ │  Pod 2   │ │  Pod 3   │    │
│  └────┬─────┘ └────┬─────┘ └────┬─────┘    │
└───────┼────────────┼────────────┼──────────┘
        │            │            │
        └────────────┼────────────┘
                     ▼
              ┌─────────────┐
              │   Harbor    │
              │  Registry   │
              └─────────────┘