SAST Scan
Want to catch security vulnerabilities while you write code? SAST (Static Application Security Testing) is a technique that analyzes source code statically, without executing it, to detect security vulnerabilities. It is like a code reviewer examining your code from a security perspective.
The earlier security vulnerabilities are found in development, the lower the cost to fix them. By integrating SAST into a CI/CD pipeline, security checks run automatically on every commit, preventing vulnerabilities from reaching production.
Overview
- Analysis target: Source code in a Git repository
- Analysis engines: Semgrep + OpenGrep (run sequentially, no user selection UI)
- Result merging: Results from both tools are merged and provided as a union
- SBOM/License: Generated independently, NOT as a SAST byproduct (see SBOM Generation)
KIOPS's SAST runs Semgrep (the base engine) first, and once Semgrep succeeds it then runs OpenGrep (advanced with extended rule sets), merging their results as a union. The UI does not provide a toggle for selecting a tool.
Analysis Engines (Reference)
KIOPS runs two SAST engines sequentially.
Semgrep
A lightweight static analysis tool that provides fast pattern-based analysis.
- Analysis method: Pattern matching - detects code that matches defined patterns
- Analysis basis: OWASP Top-10-based security rule sets
- Role: The base SAST engine
OpenGrep
An advanced engine that widens detection coverage with extended rule sets.
- Analysis method: A Semgrep-compatible rule engine applying extended security audit rule sets
- Analysis basis: CWE Top-25 and security audit rule sets
- Role: Detects additional items that the base rule set misses
The OWASP (Open Web Application Security Project) Top 10 is a list of the ten most critical web application security risks. It includes the most common and dangerous vulnerabilities, such as SQL Injection, XSS, and authentication flaws.
Step 1: Starting a SAST Scan
- Click the [Security Analysis] menu under the "Security" group in the sidebar.
- Select a service to analyze from the card carousel at the top of the page.
- Select the SAST tab.
- Click the Start Scan button on the trigger bar at the top.
Entering /security?id={serviceId}&area=sast opens the SAST tab for that service directly.
Step 2: Scan Input Items
The SAST scan trigger bar uses the following items.
- Git repository URL (required): The repository URL to analyze
- Branch (optional, default
main): The branch name to analyze - Git token (optional, for private repos): A token with repository read permission
The Git URL, branch, and token can be registered in the Settings tab, shared across SAST/IaC/Secret. Once registered there, they are used automatically for SAST scans.
If you do not enter a Git token directly, the backend automatically uses the token stored in the Settings tab or in the organization settings. In many cases you can start a scan immediately without registering a token separately.
Step 3: Sequential Analysis Flow
When a scan starts, Semgrep runs first, and once Semgrep succeeds, OpenGrep runs next. Semgrep applies the base OWASP Top-10 rule set, while OpenGrep applies extended rule sets (Security Audit, CWE Top-25, and Secrets). Because they use the same engine but different rule sets, cross-verification naturally occurs. Both tools report progress independently via WebSocket, so the progress display can appear as if they run together, but the actual execution is sequential. The results of both tools are merged as a union and displayed in a single result screen.
Repo Clone
    │
    ▼
Semgrep (base security rule set)
    Load rules → Scan files
    │
    ▼ (if Semgrep succeeds)
OpenGrep (advanced extended rules)
    Load rules → Scan files
    │
    ▼
Union merge
Analysis States
- Idle: Waiting for analysis
- Analyzing: Analysis in progress (WebSocket progress available)
- Completed: Analysis complete (results available)
- Failed: Analysis failed (check the error message)
Important: SBOM and license are no longer SAST byproducts. They are generated exclusively through the independent scan in the SBOM / License tab (Syft + ScanCode) and can be run anytime, independent of SAST. See the SBOM Generation document for details.
Step 4: Reviewing Results
When analysis completes, you can review the detected vulnerabilities on the result screen.
4.1 Result Summary
- Total findings: The total number of detected vulnerabilities
- By severity: The number of vulnerabilities classified as Critical/High/Medium/Low
- Detecting tool: Whether each item was detected by Semgrep, OpenGrep, or both (cross-verified)
4.2 Categorized View
Each vulnerability can be classified and handled with the following statuses.
- open: Newly detected, unhandled item
- resolved: Fix completed
- false_positive: Confirmed false positive
- accepted_risk: Risk accepted
Each vulnerability item shows which tool detected it.
- Cross-verified: Detected by both Semgrep and OpenGrep (higher confidence)
- Single tool: Detected by one tool only (e.g., "Semgrep only", "OpenGrep only")
You can always see which tool found each result, enabling source tracking in the security analysis workflow.
4.3 Vulnerability Details
Clicking each vulnerability shows the following information.
- File location: The file path and line number where the vulnerability was found
- Vulnerability type: SQL Injection, XSS, Command Injection, etc.
- Severity: Critical/High/Medium/Low
- Description: A detailed explanation of why the vulnerability is dangerous
- CWE ID: A standard vulnerability classification identifier (e.g., CWE-89 is SQL Injection)
If fixing all vulnerabilities at once is difficult, start with Critical and High severity. Authentication/authorization-related and injection vulnerabilities should be addressed first.
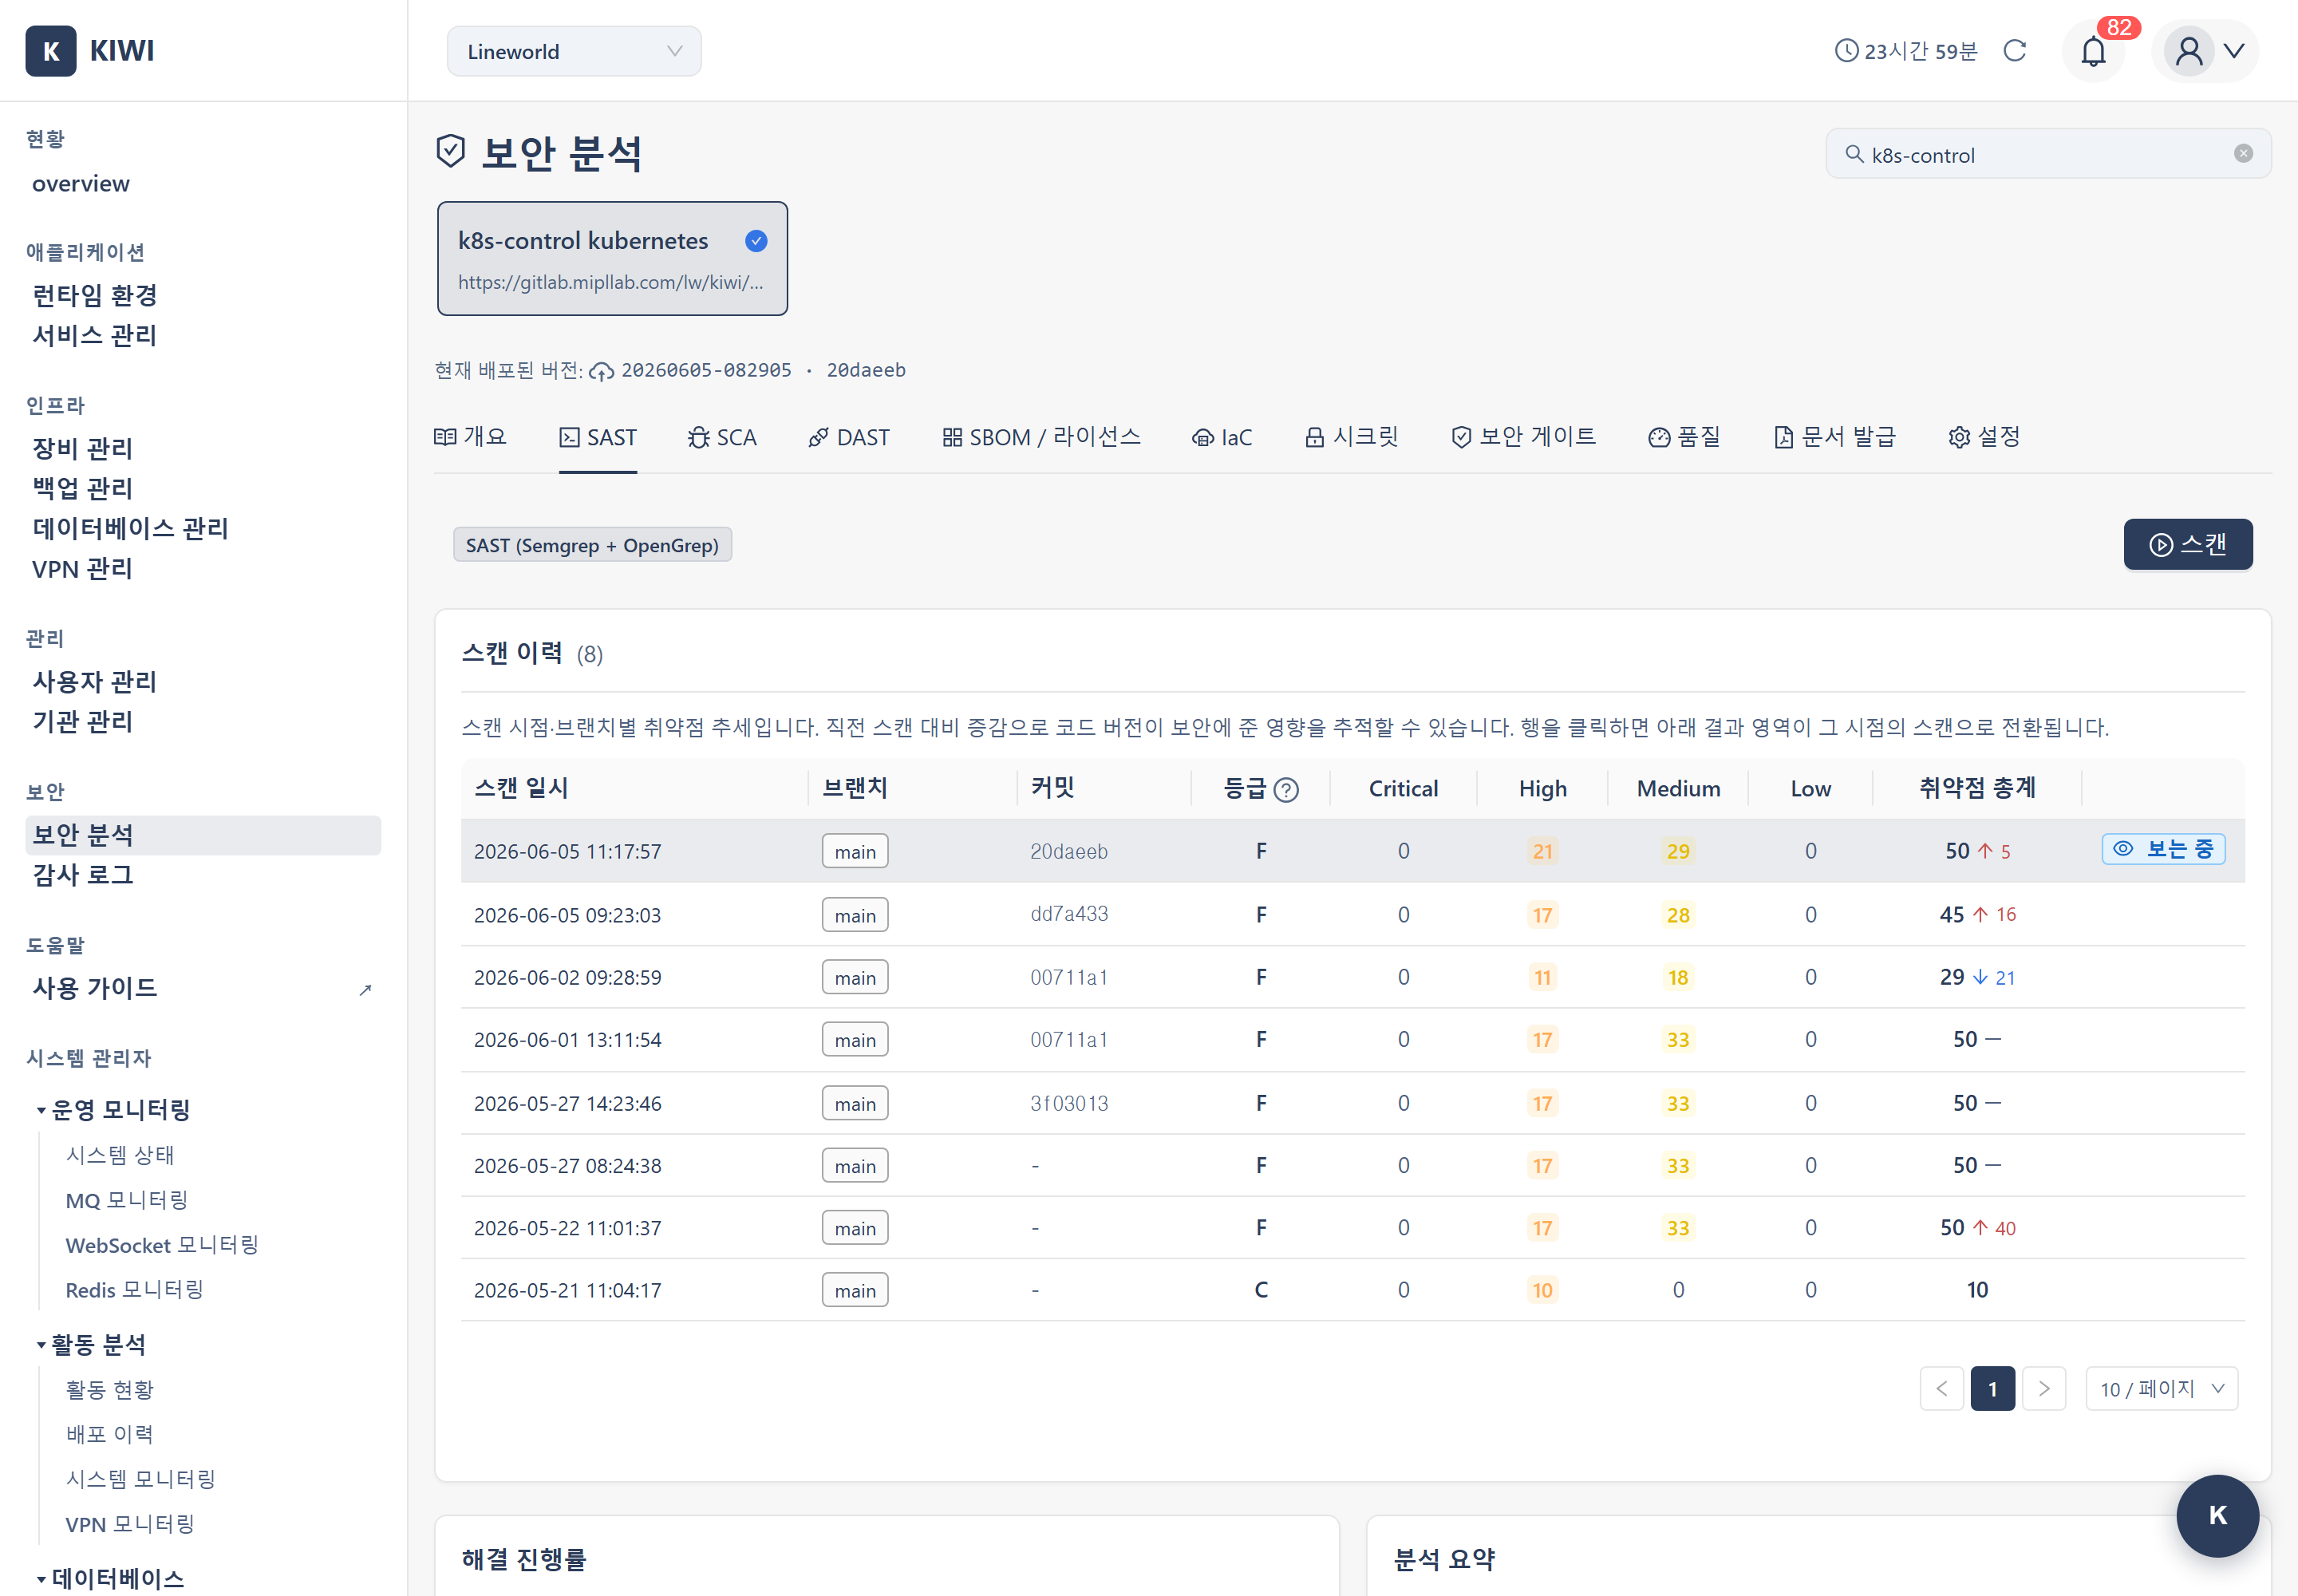
4.4 Scan History and Version Tracking
Scan History Table — View recent SAST scans in chronological order.
- Scan time: When the scan ran (sorted newest first)
- Branch: The scanned branch name
- Commit: Git commit SHA of the scan target (first 7 characters shown; hover for full SHA)
- Grade: Security score-based grade (A–F)
- Severity counts: Number of Critical/High/Medium/Low vulnerabilities
- Total vulns: Sum of all severities (shows increase/decrease arrows vs. previous scan)
- Viewing: Highlights the selected row
Row selection — view past scan results: Click a row in the scan history table to switch the results area below to that point in time. The "Viewing" label appears on the selected row. While viewing a past scan, a "You are viewing a past scan result" banner appears at the top of the results area; click the "Back to latest scan" button in that banner to return to the latest scan. (There is no separate return button in the history table itself.)
Deployed Version Tracking (Outdated Signal): If the scanned commit differs from the actual deployed commit, an "outdated" tag appears next to the SAST item name in the security overview. Hovering over the tag shows a notice that the analyzed commit differs from the currently deployed commit, warning that the results may be based on older code. A scan of the latest code version is recommended.
Key Detected Vulnerability Types
Knowing the representative vulnerability types SAST detects helps you prevent them while writing code.
Injection
Occurs when external input is used directly in a query or command.
-
SQL Injection (CWE-89): When user input is inserted directly into an SQL query
// Vulnerable code
String query = "SELECT * FROM users WHERE id = " + userId;

// Safe code
PreparedStatement stmt = conn.prepareStatement("SELECT * FROM users WHERE id = ?");
stmt.setString(1, userId); -
Command Injection (CWE-78): When user input is used in OS commands
-
LDAP Injection (CWE-90): When user input is inserted into an LDAP query
Authentication/Authorization
- Broken Authentication (CWE-287): Flaws that allow authentication to be bypassed
- Hardcoded Credentials (CWE-798): Passwords or API keys hardcoded in source code
- Insufficient Authorization (CWE-285): Inadequate permission checks
Do not write passwords, API keys, or tokens directly in source code. Use environment variables or a secrets management tool. Exposed credentials can also be detected by the Secret Scan.
Data Exposure
- XSS (CWE-79): Malicious scripts can be injected into web pages
- Sensitive Data Exposure (CWE-200): Sensitive data exposed in logs or error messages
- Path Traversal (CWE-22): Unintended files can be accessed using
../
Severity Classification
SAST determines severity from Semgrep and OpenGrep SARIF results in this order.
- properties.severity (priority): Explicit severity in the finding (critical/high/medium/low)
- rule.level fallback (if properties.severity is absent):
error→ Criticalwarning→ Highnote→ Medium- (other) → Medium (default)
On 2026-06-01, SAST severity logic was unified with AST to ensure consistency. Previously, some findings would show different severities in AST and KIOPS because rule.level was consulted while properties.severity was ignored.
Troubleshooting
Analysis Failure
If analysis failed, check the following.
-
Unsupported language: Semgrep and OpenGrep detect languages for which rule sets are defined. Specialized languages or closed formats may produce empty results.
-
Cannot access code: Check that the Git token has repository read permission. If you did not enter a token directly, the token stored in the Settings tab or organization settings is used automatically. If both tokens are expired/missing, analysis fails.
-
Timeout: Large repositories may take a long time to analyze. Limit the analysis scope to a specific branch.
Handling False Positives
SAST may occasionally report code that is not actually vulnerable. Changing such an item to the false_positive or accepted_risk status auto-classifies identical items in future scans.
Too many false positives lead developers to ignore SAST results. Actively classify confirmed false positives as false_positive so you can focus on real vulnerabilities.
Related Guides
- SCA Scan - Dependency vulnerability analysis
- DAST Scan - Dynamic security testing
- SBOM Generation - Generated independently (not tied to SAST)
- Secret Scan - Exposed credential detection