Database Management
Path: /database
Connect external databases to KIOPS and manage data synchronization and restoration. This page allows you to centrally manage multiple databases and set up automated synchronization tasks.
If you cannot access this page, please request Database Management permission from your organization administrator.
Why Do You Need Database Management?
In a DevSecOps environment, you need to manage databases across multiple environments such as development, testing, and production. With KIOPS's database management features, you can:
- Centralized Management: Securely manage multiple DB connection credentials in one place.
- Automated Synchronization: Maintain data consistency by regularly syncing data between environments.
- Quick Recovery: Rapidly restore to a specific point in time when issues occur
- Enhanced Security: Secure DB access through SSH tunneling and SSL connections.
Supported Databases
KIOPS primarily supports the MySQL/MariaDB family. Additional database connections may be possible depending on the operating environment.
- MySQL (5.7+): Supports Connect, Sync, and Backup/Restore. Most widely used database.
- MariaDB (10.3+): Supports Connect, Sync, and Backup/Restore. Highly compatible with MySQL — they share the same driver, and most applications written for MySQL run on MariaDB as-is.
- PostgreSQL / Oracle and others: Connection may be supported depending on the environment. Actual supported scope can vary based on the production setup.
Key Features
DB Connection
Core features for registering and managing database connections.
- Register Connection: Save new DB connection info. Use when adding a new DB.
- Connection Test: Immediately verify connectivity. Use before registration or when troubleshooting.
- Connection Type (
connection_type): Pick the appropriate option based on your network.- direct: KIOPS connects directly to the DB.
- ssh: Reaches the DB through an SSH tunnel.
- ssh+jump: Routes through an additional jump server (bastion host).
- SSL/TLS Connection: Use when an encrypted secure connection is required.
SSH tunneling forwards database traffic through an SSH connection, providing secure access to internal-network databases through a jump server (bastion host).
Synchronization Tasks
Synchronize data between source and target databases. Use it to copy production data to development/testing environments or for backup purposes.
- Manual Sync: Execute once immediately. Recommended for testing or emergency situations.
- Automatic Sync: Run repeatedly on schedule. Recommended for regular data updates.
- Full Sync: Synchronize all tables. Recommended for initial setup or full replication.
- Selective Sync: Sync only specified tables. Recommended when specific data is needed.
- Source-first: Overwrites target DB with source DB data (potential data loss)
- Target-first: Keeps target DB data on conflict (ignores source changes)
Always test before applying to production environments!
Data Restore
Restore data to a specific point in time using backup files or snapshots.
Migration
Features for migrating or upgrading databases to different environments. Migration is a one-time transfer (e.g., dev→staging→prod, DB server replacement), whereas synchronization is repetitive data replication on a regular basis.
The Migration tab offers two operations via a "Source Type" radio.
- Registered DB connection (schema comparison): Compares the schemas of a source DB and a target DB, and applies the source DB's structure to the target DB when differences are found.
- Schema comparison: Shows differences in tables, columns, indexes, and FK relations in table form.
- Run migration: When schema differences are found, applies the source DB's schema to the target DB.
- Backup before migration: Toggling this switch automatically backs up the target DB before running (recommended). It can be used for recovery if issues occur.
- Stored data package (one-time apply): Applies an SQL package stored in the Data Package tab to a target DB once.
- The engine compatibility of the package and the target DB is checked automatically. Only the same engine (including MySQL↔MariaDB) can be applied without conversion.
- A cross-engine pair (e.g., MySQL package → PostgreSQL target) shows a "Cross-DB — migration not possible" warning and the Apply button is disabled.
- Before applying, a Package content preview (included tables, SQL kind) and a migration validation (dry-run) let you check for errors and conflicts in advance.
The Migration tab only offers two paths: comparing registered DB connections, or applying an SQL package already stored in the Data Package tab. To import a new SQL dump file into KIOPS, use the Upload SQL File feature on the Data Package tab (see Data Package below).
Data Package
A Data Package is a repository inside KIOPS where you upload and store SQL dump files you have. Once registered, the same data can be re-applied to multiple environments at any time. The Upload SQL File button on this tab is the only entry point for importing an SQL dump file into KIOPS.
- Location: The Data Package tab on the [Database Management] page
- Columns: Name / Kind (Import/Export) / DB Type / Size / Status / Created / Actions
- import: A package registered by uploading an SQL file you have.
- export: A package created by KIOPS dumping a source DB directly (when that feature is enabled).
- Status tags (use these tags to track a package's progress):
ready(blue, "Ready") — ready to applyapplying(orange, "Applying") — currently being applied to a target DBapplied(green, "Applied") — successfully appliedfailed(red, "Failed") — an error occurred during apply (hover the status tag to see the error message)deleted(gray, "Deleted") — deleted entry
- Main actions:
- Upload SQL File: Selecting a
.sqlor.sql.gzfile uploads it immediately to the repository (just pick the file — no separate modal). It is not applied at upload time, and the status becomesready. - Download: Download a stored package to your local PC. Useful for archiving or sending elsewhere.
- Apply to a target DB: Pick a stored dump and apply it to a target DB (the on-screen tooltip is simply "Apply"). Clicking it opens the package apply modal.
- Delete: Remove a package you no longer need (with a confirm popup).
- Refresh: Reload the list with the latest state.
- Upload SQL File: Selecting a
- Button availability: Apply is disabled for
applying/deletedpackages; download is also disabled fordeletedpackages.
- 30-day retention policy: Registered packages are automatically cleaned up 30 days after creation. Download dumps that need long-term retention to your local machine.
- 5GB quota per organization: The total storage available per organization is 5GB. Uploads or applies are rejected if the quota would be exceeded.
DB Backup Management
Features for directly backing up and restoring databases. You can backup DB data separately from KIOPS's infrastructure backups (etcd, Docker).
- Manual Backup: Create backup immediately. Use to preserve current state before important operations.
- Scheduled Backup: Automatically backup on schedule. Set your preferred frequency like daily at midnight, every Sunday, etc.
- Retention Policy: Old backups can be cleaned up by either retention period or retention count, depending on the operating environment (actual policy varies).
- Point-in-time Restore: Select and restore from a specific point in the backup list.
DB performance may briefly degrade during backups and large DBs can take a long time, so production backups are recommended during off-peak hours (early morning).
UI Layout
The Database Management page consists of the following 6 tabs. Tab visibility may vary based on user permissions; Sync Tasks and Migration tabs are only visible to users with the corresponding permissions.
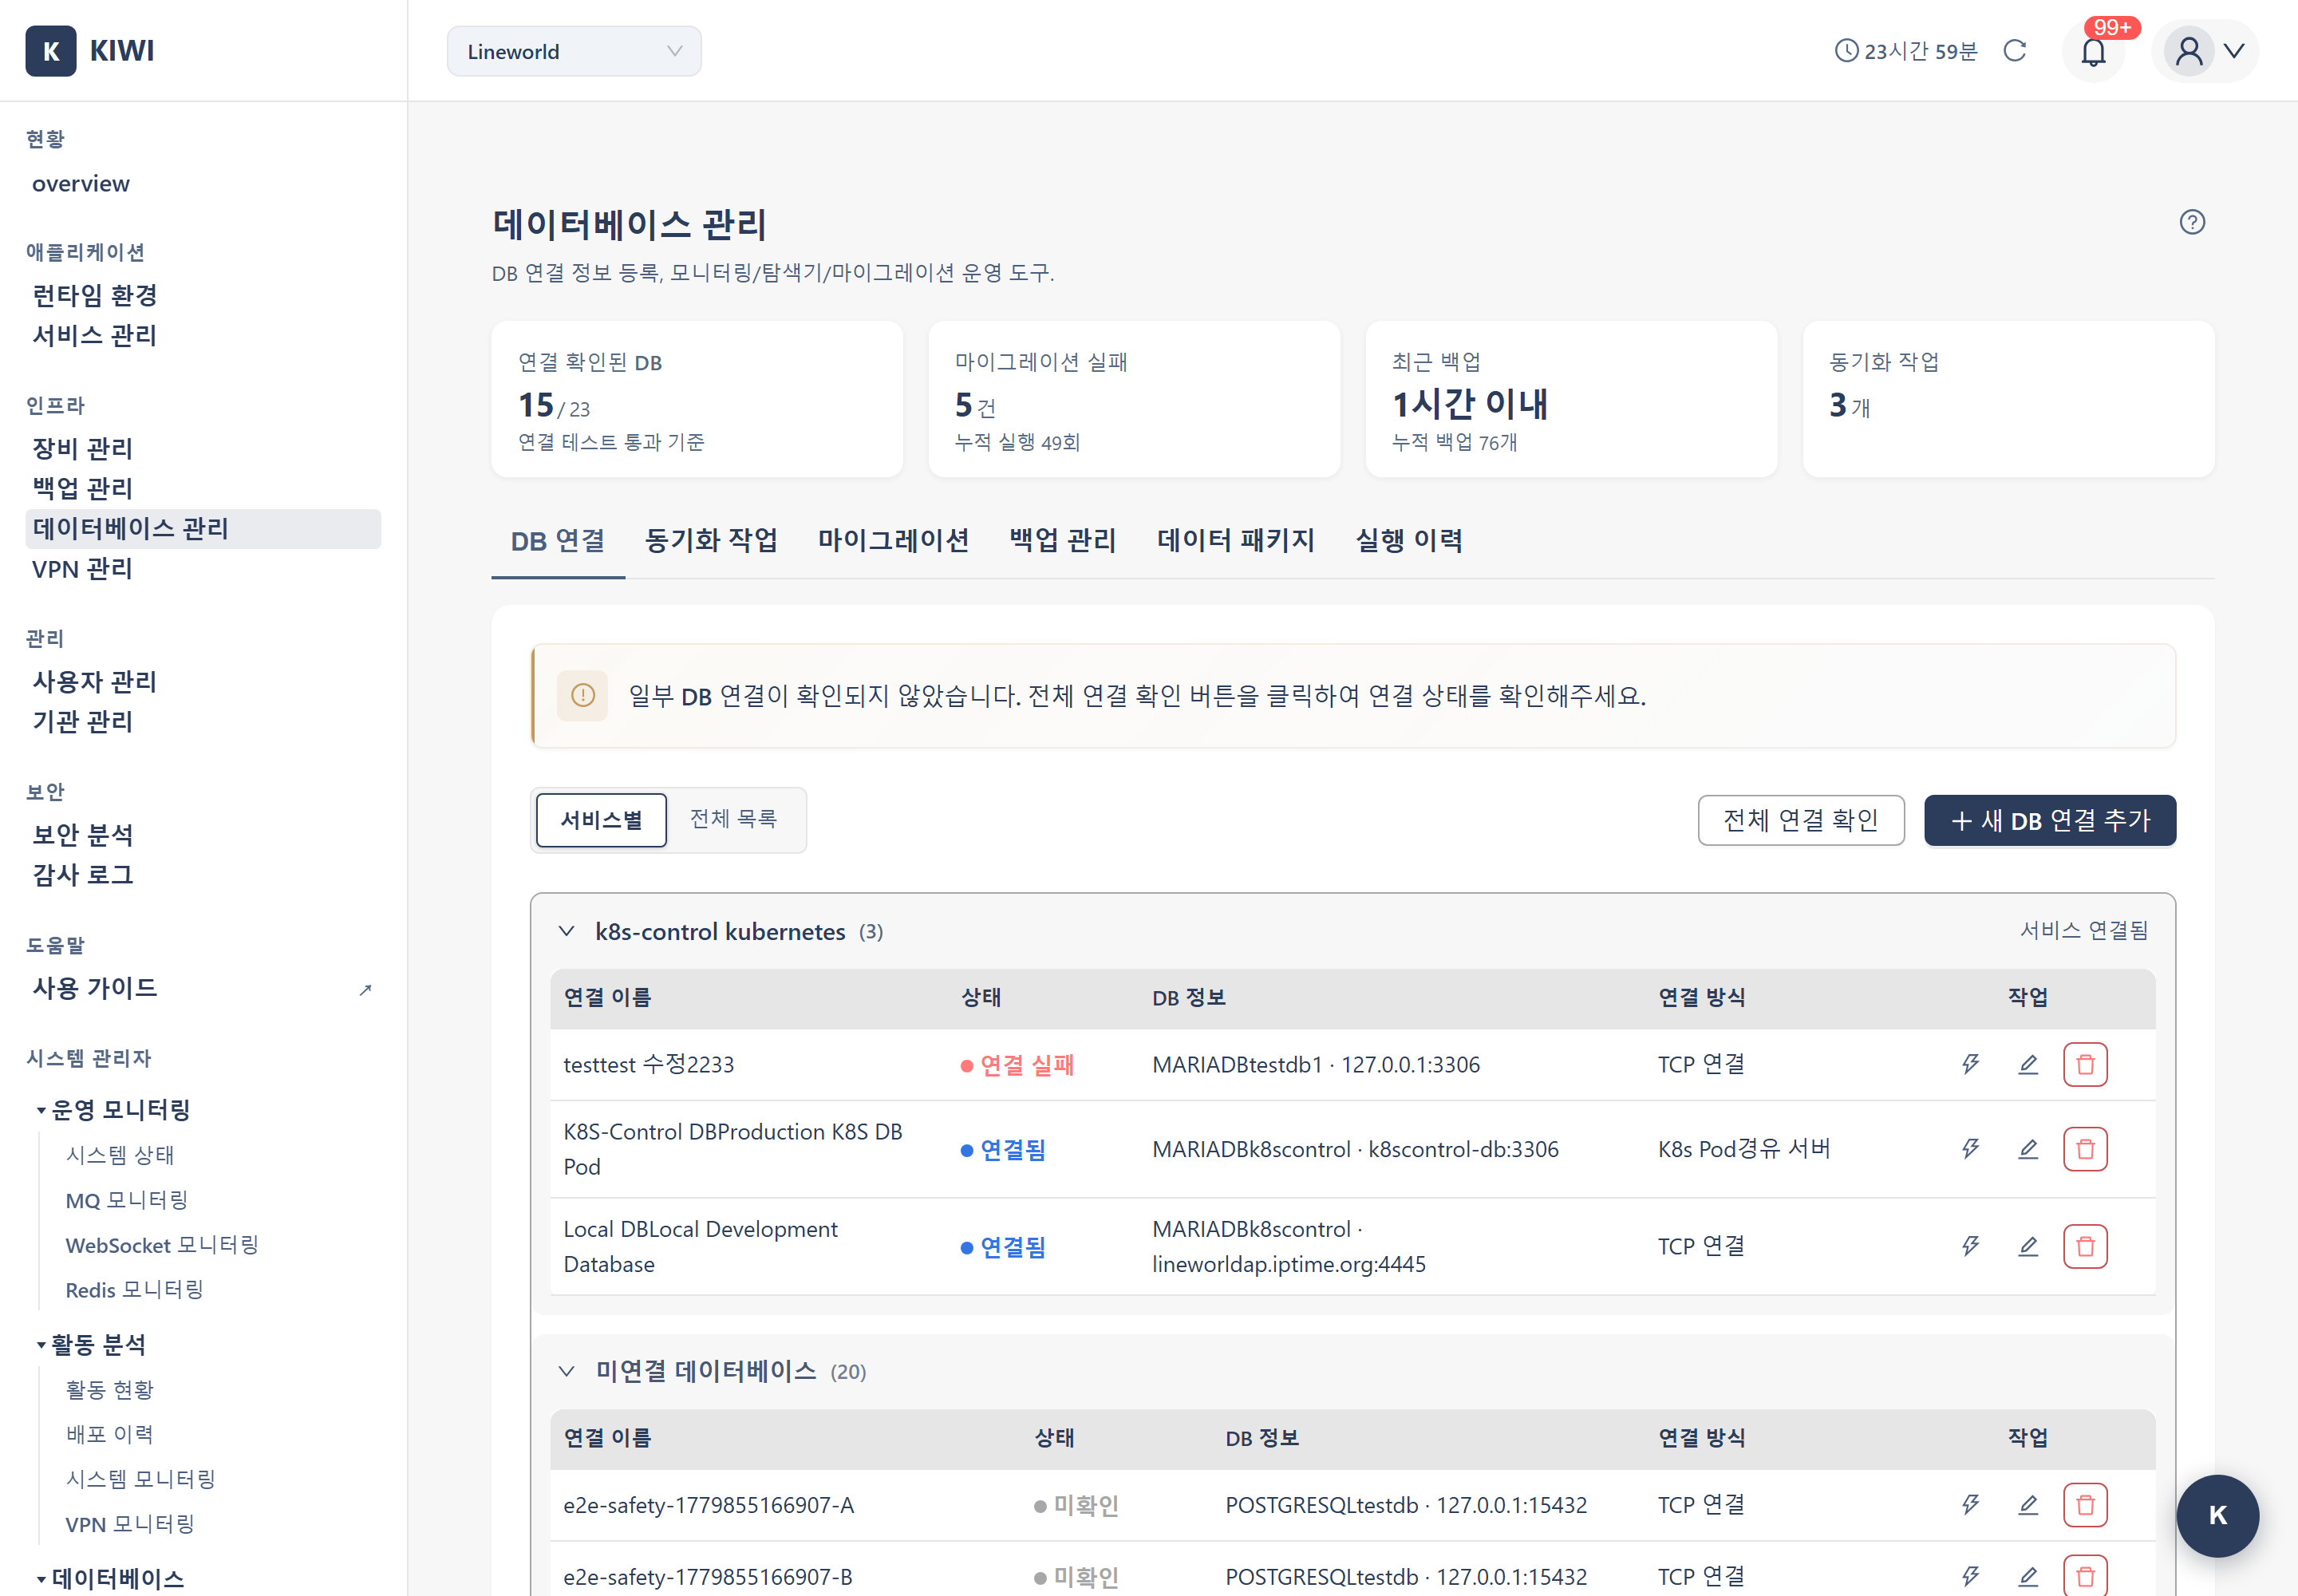
- DB Connection: Register and manage database connections. View connection list, status, type, and add new connections.
- Sync Tasks: Configure and run synchronization between two DBs. View task list, schedule, and next run time. (Sync permission required)
- Migration: A "Source Type" radio offers two operations: (1) schema comparison + migration between registered DB connections, and (2) one-time apply of a stored data package. (Migration permission required)
- Backup Management: Create and restore DB backups. Manage scheduled backup settings and restore history.
- Data Package: A repository for uploading and storing SQL dump files you have inside KIOPS so they can be re-applied, downloaded, or deleted. Subject to 30-day retention and a 5GB per-organization quota.
- Execution History: View execution records for all operations including sync, migration, and backup/restore. Shows execution time, result, and error messages.
Statistics Cards
The top of the page shows summary cards for a quick overview. Only four cards appear — DB Connections / Migration / Backup / Sync Tasks — and Data Package is not included in the statistics cards.
- DB Connections: Total number of registered DB connections.
- Migration: Number of migration tasks and recent status.
- Backup: Number of registered backup policies/history entries.
- Sync Tasks: Number of registered synchronization tasks.
PlatformAdmin-Only Pages
The DB Explorer (/db-explorer) and DB Monitoring (/db-monitoring) features are exposed only on PlatformAdmin-only routes and are not shown on the regular [Database Management] page. Users with PlatformAdmin permission access them through separate menu entries.
Information in the Connection List
- Name: An easily identifiable name for the connection (e.g., "ProdDB", "DevDB")
- Type: MySQL, MariaDB, PostgreSQL, etc.
- Host: DB server address.
- Port: DB port number.
- Connection Status: Current connectivity (green: normal, red: unreachable)
Glossary
Simple explanations for terms you may encounter for the first time.
- Schema: The logical structure of a database (tables, relationships, etc.). In MySQL, it's synonymous with database.
- SSL/TLS: Security protocols that encrypt network communication. Same as what's used in HTTPS.
- SSH Tunneling: A technique for securely forwarding other service traffic through an SSH connection.
- cron expression: Standard syntax for specifying scheduled task timing in Unix-like operating systems.
- Dump: Exporting database structure and data to an SQL file.
- Jump Server: A relay server for accessing internal networks from outside (bastion host).
How to Use
1. Registering a DB Connection
Here's how to register a new database connection.
Step 1: Start Adding a Connection
- Navigate to the [Database Management] page
- Select the DB Connection tab
- Click the Add Connection button in the upper right corner.
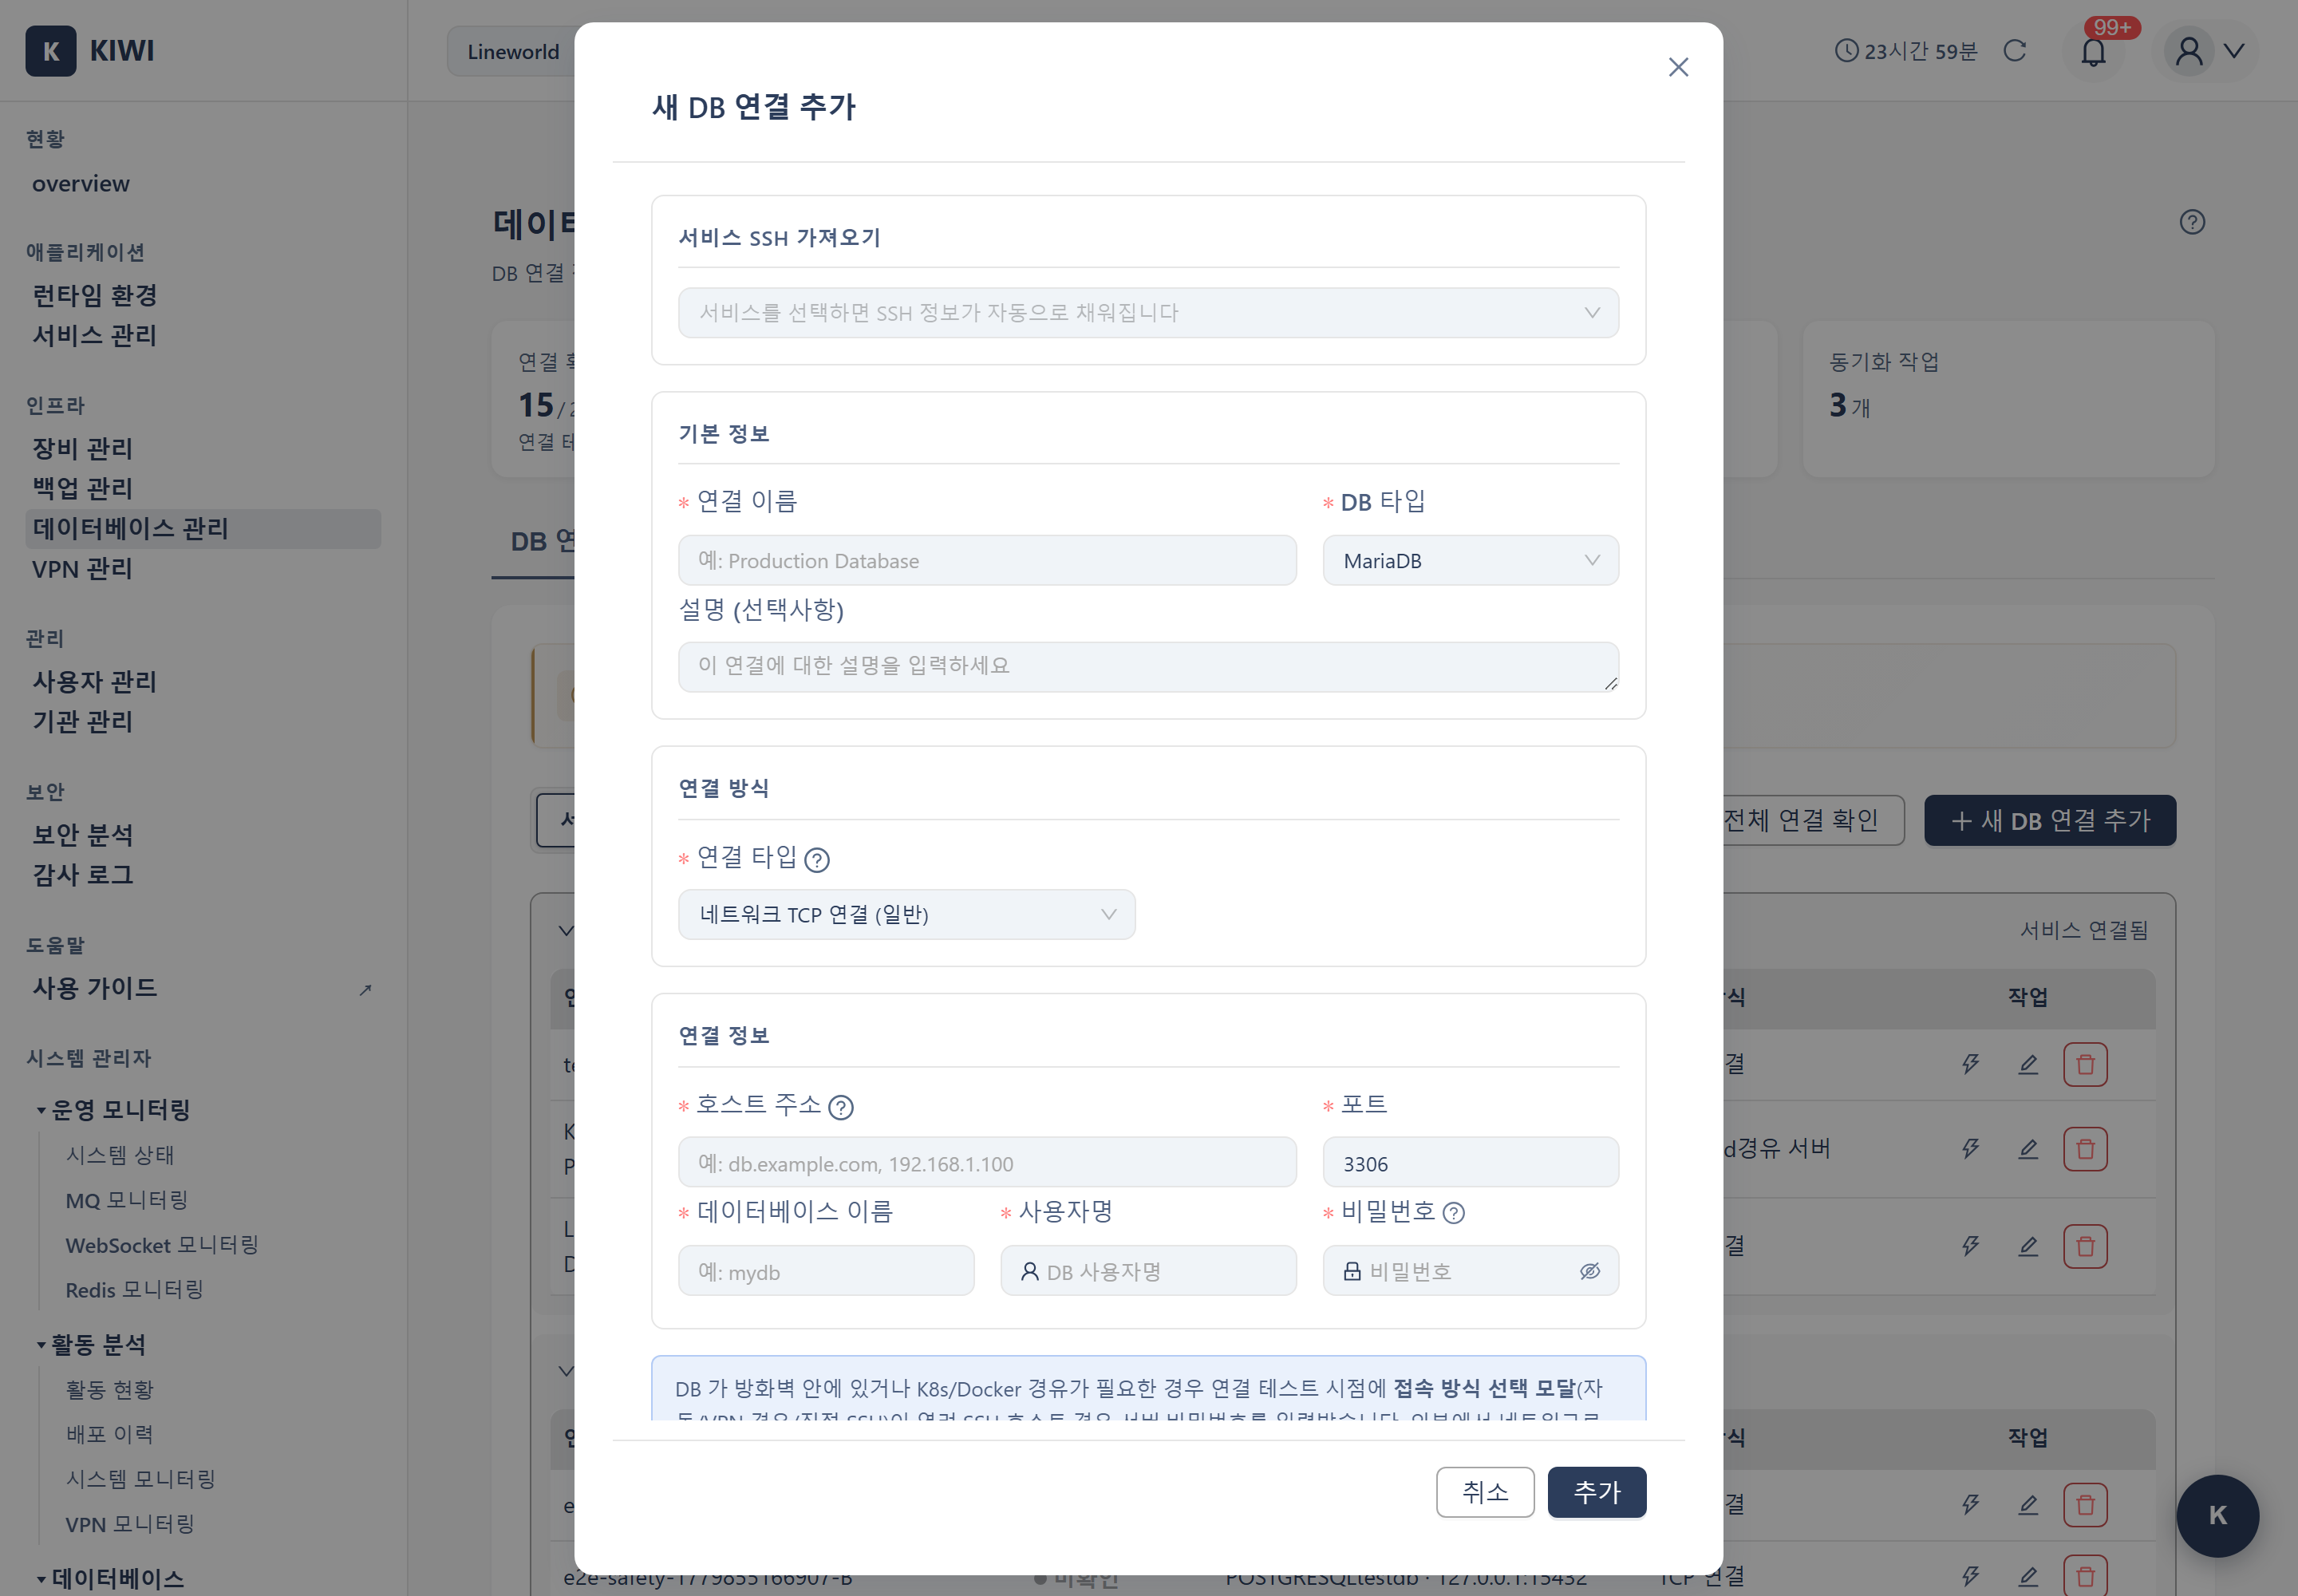
Step 2: Enter Basic Information
- Connection Name (Required): An identifiable name. Example: "Prod-UserDB".
- DB Type (Required): Database type. Example: MySQL.
- Host (Required): Server IP or domain. Example: 192.168.1.100.
- Port (Required): DB port number. Defaults are 3306 for MySQL/MariaDB, 5432 for PostgreSQL, and 1521 for Oracle. If your server uses a different port, enter the actual port.
- Database (Required): DB name (schema). Example: kiwi_prod.
- Username (Required): DB account. Example: admin.
- Password (Required): DB password. Example: ********.
Step 3: Advanced Settings (Optional)
- Use SSL: Enable if encrypted connection is required.
- SSH Tunnel: Configure when accessing DB behind firewalls.
- Connection Timeout: Increase the value for slow network environments.
Step 4: Test Connection and Save
- Click the Test Connection button to verify connectivity.
- When "Connection successful" message appears, click Save
If the connection test fails, verify the host/port/account information, confirm the port is open in the DB server's firewall, and check that the DB user has remote access permission.
2. Configuring SSH Tunnel
Use SSH tunneling to access a DB behind a firewall.
When Do You Need SSH Tunnel?
- When the DB server is on an internal network and cannot be accessed directly.
- When security policy only allows access through a jump server (bastion host)
- When you need to securely access company DB from outside.
Choosing a Connection Type (connection_type):
- direct: KIOPS connects directly to the DB without SSH.
- ssh: A single SSH tunnel through an SSH server.
- ssh+jump: A multi-hop tunnel that goes through an additional jump server.
Configuration Steps:
-
Enable the Use SSH Tunnel option in the add/edit connection screen, or pick
ssh/ssh+jumpfor the connection type. -
Enter SSH server information:
- SSH Host: Jump server IP. Example: 10.0.0.50.
- SSH Port: SSH port (default 22). Example: 22.
- SSH User: SSH account. Example: deploy.
- Authentication method: Choose between password or SSH key
- Password: Enter the SSH password
- SSH Key: Upload an SSH private key file (.pem, .key)
-
Enter the DB host address relative to the SSH server
- If DB is on the same machine as SSH server:
localhostor127.0.0.1 - If DB is on another server in the internal network: that server's internal IP
- If DB is on the same machine as SSH server:
-
Click Test Connection then Save
With an SSH tunnel, an encrypted channel ([KIOPS] → [SSH Tunnel] → [Jump Server] → [DB Server]) is created from KIOPS to the jump server, and the DB is reached through that channel.
3. Creating a Sync Task
Set up a task to synchronize data between two databases.
Step 1: Add Task
- Select the Sync Tasks tab
- Click the Add Task button.
Step 2: Basic Configuration
- Task Name: A descriptive name (e.g., "Prod→Dev Sync")
- Source DB: Select the source connection to fetch data from
- Target DB: Select the destination connection to store data
Step 3: Select Sync Options
- Full Sync: Synchronizes all tables.
- Selective Sync: Synchronizes only selected tables.
- Conflict Resolution:
- Source-first - Overwrites with source data on conflict
- Target-first - Keeps target data on conflict
Step 4: Schedule Settings (Automatic Sync)
- Hourly: Run every N hours (e.g., every 6 hours).
- Daily: Run at a fixed time each day (e.g., 03:00).
- cron expression: Custom schedule, e.g.,
0 3 * * 1for every Monday at 3 AM.
The cron expression format is minute(0-59) hour(0-23) day(1-31) month(1-12) weekday(0-6, 0=Sunday). Common examples: 0 3 * * * (every day at 3 AM), 0 */6 * * * (every 6 hours), 0 0 * * 0 (every Sunday at midnight).
Step 5: Save Review your settings and click the Save button.
4. Running a Sync Task Immediately
Execute a configured sync task right away.
- Find the task you want to run in the Sync Tasks tab
- Click the Run button for that task
- Click Confirm in the confirmation popup
- Monitor progress through the progress bar
- After completion, check results in the Sync History tab
Running a sync changes data in the target DB and can take a long time on large tables, so run production DB syncs during periods of minimal service impact (early morning).
5. Running Migration
In the Migration tab, a "Source Type" radio offers two operations.
5-1. Compare Registered DB Connections, Then Migrate
Compare the schemas of two DBs and apply the differences to the target DB.
Step 1: Choose the Source Type
- Select the Migration tab.
- Under "Source Type", choose Registered DB connection (schema comparison) (the default).
Step 2: Source/Target Configuration
- Source DB (origin): Select the DB used as the comparison baseline.
- Target DB (destination): Select the DB the structure will be applied to.
- Both DBs must be in a connection-verified state to appear in the selection list. At least two connected DBs are required.
Step 3: Configure the backup option
- Toggle the Backup before migration switch to automatically back up the target DB before running. It can be used for recovery if issues occur, so it is recommended.
Step 4: Compare schemas
- Click the Compare Schemas button.
- Table differences, column differences, and FK relations are shown in a table.
Step 5: Run the migration
- When schema differences are found, the Run Migration button appears.
- If the target DB includes tables that already contain data, a data-loss warning is shown.
- Running it applies the source DB's schema to the target DB.
Large DB migrations may take significant time and can affect service, so run production migrations during a maintenance window and always enable the Backup before migration option.
5-2. Apply a Stored Data Package (One-Time)
Apply an SQL package stored in the Data Package tab to a target DB.
Step 1: Choose the Source Type
- Select the Migration tab.
- Under "Source Type", choose Stored data package (one-time apply).
Step 2: Select the package and target
- Source — data package: Select a stored SQL package.
- Target DB (destination): Select the target DB to apply to (only connection-verified DBs are shown).
- The engine compatibility of the package and the target DB is checked automatically.
- If the engine is the same (including MySQL↔MariaDB), an "Engine compatibility OK" notice is shown.
- If the engines differ, a "Cross-DB — migration not possible" warning is shown and the Apply button is disabled.
Step 3: Preview and validate (optional)
- Package content preview: Check the tables included in the package and the SQL kind (schema/data).
- Migration validation (dry-run): Actually runs the package SQL in an isolated space to check for FK violations, syntax errors, and conflicts in advance. The actual target DB is not changed.
Step 4: Choose an apply mode and run
- New import (append): Applies the package's CREATE/INSERT statements as-is. May fail on PK/UK conflicts.
- Wipe and import (replace): Empties the target schema/data and fills it with the package content.
- Click the Apply Package button to start the apply.
The replace mode empties existing tables/data in the target DB and fills it with the package content. The operation cannot be undone. Always create a backup of your production DB before applying, or try append mode first.
5-3. Using Data Packages
How to upload SQL dump files you have into KIOPS, store them, and reuse them. As an everyday analogy: Upload is like plugging a USB stick you have onto a shelf; Download is taking the USB back to your PC; Apply is pulling the USB off the shelf and unpacking it onto another computer; Delete is discarding a USB you no longer use.
If creating the dump file yourself (via pg_dump or mysqldump) is difficult, ask the IT contact or DB administrator of the source DB to produce the dump file for you. Once you have the .sql or .sql.gz file, upload it on the Data Package tab.
Upload a package (store only)
- Select the Data Package tab.
- Click the Upload SQL File button (upload icon).
- Selecting a
.sqlor.sql.gzfile uploads it immediately with no separate modal (up to 1 GB) — its status becomesready. At this point it is not applied; it is only stored in the repository.
Apply a stored package
- Click the Apply button (lightning-shaped icon) on the row you want to apply.
- In the package apply modal, select the target DB and apply mode (append/replace, default replace).
- Enter the target DB / SSH / Jump passwords and click Apply.
- Track progress with the status tag on the Data Package tab — it changes to
applyingwhile applying,appliedon success, andfailedon failure.
Download a package
- Click the Download button (download icon) on the desired row.
- The original file is saved to your local PC (useful for migrating elsewhere or long-term archiving).
Delete a package
- Click the Delete button (delete icon) on the row to remove.
- After confirming the popup, the package is permanently deleted.
Refresh the list
- Click the Refresh button (refresh icon) in the top-right to reload the latest state.
6. Creating DB Backup
Backup your database for safekeeping.
Manual Backup:
- Select the Backup Management tab
- Click the Create Backup button.
- Select the target DB connection.
- Configure backup options:
- Backup Name: Easily identifiable name (e.g., "ProdDB-2024-03-15")
- Include Items: All or specific tables.
- Click Start Backup
Scheduled Backup Setup:
- Click the Schedule Settings button in the Backup Management tab
- Select the target DB
- Configure schedule:
- Daily: Run at specified time every day (e.g., 03:00)
- Weekly: Run on specific days (e.g., Sunday 02:00)
- Monthly: Run on specific dates (e.g., 1st at 01:00)
- Configure retention policy:
- Retention Period: Auto-delete after e.g., 30 days.
- Retention Count: Keep only e.g., last 10 backups.
- Click Save
7. Restoring DB
Restore data from backup.
- Select the Backup Management tab
- Find the backup to restore in the backup list
- Click the Restore button for that backup
- Select the target DB (can be different from original)
- Configure restore options:
- Existing Data Handling: Delete and restore / Merge
- Click Start Restore
Restore operations modify existing data in the target DB. Always backup the current state before restoring in production environments!
Execution History Status
Check the progress status of all operations including sync, migration, and backup/restore in the Execution History tab.
- completed: Operation finished successfully.
- running: Operation currently in progress.
- failed: Error occurred during operation (check details)
- pending: Waiting to run according to schedule.
For a failed operation, click it in Execution History to inspect the detailed error. Common causes: connection failure (check network/firewall), permission error (verify DB user privileges), schema mismatch (source and target structures differ — run migration validation first), insufficient space (check disk space on the target server).
Scenarios
Workflows for common situations.
Scenario 1: Applying an SQL Dump File You Have to a KIOPS Production DB
How to apply an SQL dump file received from an external partner or developer to your KIOPS production DB.
- Confirm the file you have is in
.sqlor.sql.gzformat. - Go to [Database Management] → Data Package tab → click Upload SQL File.
- Selecting the file uploads it immediately and stores it in the repository with
readystatus (up to 1 GB). - Click the Apply button on the uploaded package row.
- In the package apply modal, select your production DB connection as the target (the package engine and target DB engine must match to apply).
- Choose replace for a clean first apply, or append to add on top of existing data.
- Enter passwords, click Apply, and track progress with the status tag on the Data Package tab (
applying→applied).
Scenario 2: Re-applying a Stored Package to Other Environments (Package Reuse)
How to redistribute an uploaded package to multiple environments identically.
- The package uploaded in Scenario 1 remains in the Data Package tab.
- To apply the same data elsewhere, click the Apply button on that package row.
- In the package apply modal, pick the new target DB and apply mode.
- After entering passwords, the same package is applied to the new environment.
- Alternatively, in the Migration tab, set "Source Type" to Stored data package (one-time apply) to apply it after a preview and dry-run validation.
Packages are auto-retained for only 30 days, and an organization may use up to 5GB total. For long-term retention, take a separate local backup via the Download button.
Scenario 3: When the DB Type (Engine) Differs
If the package's DB engine and the target DB's engine differ (e.g., MySQL package → PostgreSQL target), the current KIOPS UI cannot apply it without conversion.
- The package apply path in the Migration tab checks engine compatibility and disables the Apply button with a "Cross-DB — migration not possible" warning.
- The package apply modal has no pre-block guard, but attempting to apply across engines fails due to SQL syntax mismatch.
- Packages within the same compatibility group (MySQL ↔ MariaDB) can be applied without conversion.
If you need to move data between cross-engine DBs, prepare a dump produced in the target engine's syntax and upload it, or consult your operations team. For details, see the Considerations When DB Types Differ guide.
Frequently Asked Questions
Q. How do I apply an SQL dump file I have to KIOPS? → A. Upload it via Upload SQL File on the Data Package tab, then use the Apply button on the row. See the Data Package section and Scenario 1.
Q. Can I apply a MySQL dump to PostgreSQL?
Not in the current KIOPS UI. A cross-engine pair where the package engine and target DB engine differ cannot be applied without conversion — the Migration tab disables the Apply button, and a package apply fails. Only packages within the same compatibility group (MySQL ↔ MariaDB) can be applied without conversion. For the detailed constraints, see the Considerations When DB Types Differ guide.
Q. How long are data packages retained? → A. See the Data Package - Retention period and quota section (30 days / 5GB per organization).
Q. What happens if a package apply fails?
The data package status tag changes to failed, and hovering over the status tag shows the error message. If a failure occurs while running in replace mode, some tables may be left empty — so for production DBs we strongly recommend creating a backup before applying.
Best Practices
Recommendations for safe and efficient database management.
- Use SSL connections: Essential especially for external network communication.
- Use dedicated accounts: Create sync-specific DB accounts with minimal permissions (all DB passwords are stored encrypted).
- Sync timing: Synchronize production DBs during periods of low service impact (early morning)
- Connection testing: Always run connection tests before important operations.
- History monitoring: Regularly check sync history for failures.
- Backup before restore: Always backup current state before restoring.