VPN Management
Path: /settings/vpn
This page manages VPN profiles for secure access to internal networks from external locations. It provides fast and secure connections using the WireGuard protocol.
If you cannot access this page, please request VPN Management permission from your organization administrator.
Why Do You Need VPN Management?
In DevSecOps environments, developers and operators often need to access internal systems from external locations. With KIOPS's VPN management features, you can:
- Secure Remote Access: Connect safely to internal networks through encrypted tunnels.
- Centralized Management: Manage multiple VPN profiles in one place and share with team members.
- Device Integration: Link VPN profiles to specific devices for automated access control
- Multi-Session Support: Connect to multiple VPNs simultaneously for complex network environments.
What is VPN?
VPN (Virtual Private Network) is a technology that allows secure access to internal networks through the internet. Simply put, you can access internal systems as if you were in the office, even when you're outside.
Supported VPN Types
VPN protocols supported by KIOPS.
- WireGuard (Supported): A modern and fast VPN protocol. Its concise code makes security verification easy, and it's battery-efficient on mobile devices. This is the default protocol used by KIOPS.
- OpenVPN (Coming Soon): A proven and time-tested protocol. Works in various environments.
- IPSec (Coming Soon): A standard protocol widely used in enterprise environments.
WireGuard consists of less than 4,000 lines of code, making security audits easy, and provides up to 3x faster performance than OpenVPN. It operates seamlessly during connection transitions, making it ideal for mobile environments.
Key Features
Profile Management
Save and manage VPN connection information in profile format.
- Register Profile: Save new VPN connection information. Create profiles by entering server address, authentication keys, etc.
- Edit Profile: Modify existing profile information. Profiles currently connected cannot be edited.
- Delete Profile: Remove profiles that are no longer needed.
- Search and Filter: Search profiles by name or server address and filter by type/status.
Connection Management
Connect and disconnect VPN sessions.
- Session Connect: Start a VPN connection with the selected profile. Once connected, you can access that network.
- Session Disconnect: Terminate active VPN connections.
- Connection Test: Verify that profile settings are correct before actual connection.
- Multi-Session: Connect to multiple VPNs simultaneously. Each profile maintains independent sessions.
Choosing a VPN at Task Time
When starting a device/service task, a ConnectionSelectionModal lets you pick the VPN profile to use on the fly. There is no separate UI for pre-binding devices to a specific VPN profile.
UI Layout
This section explains the components of the VPN Management page.
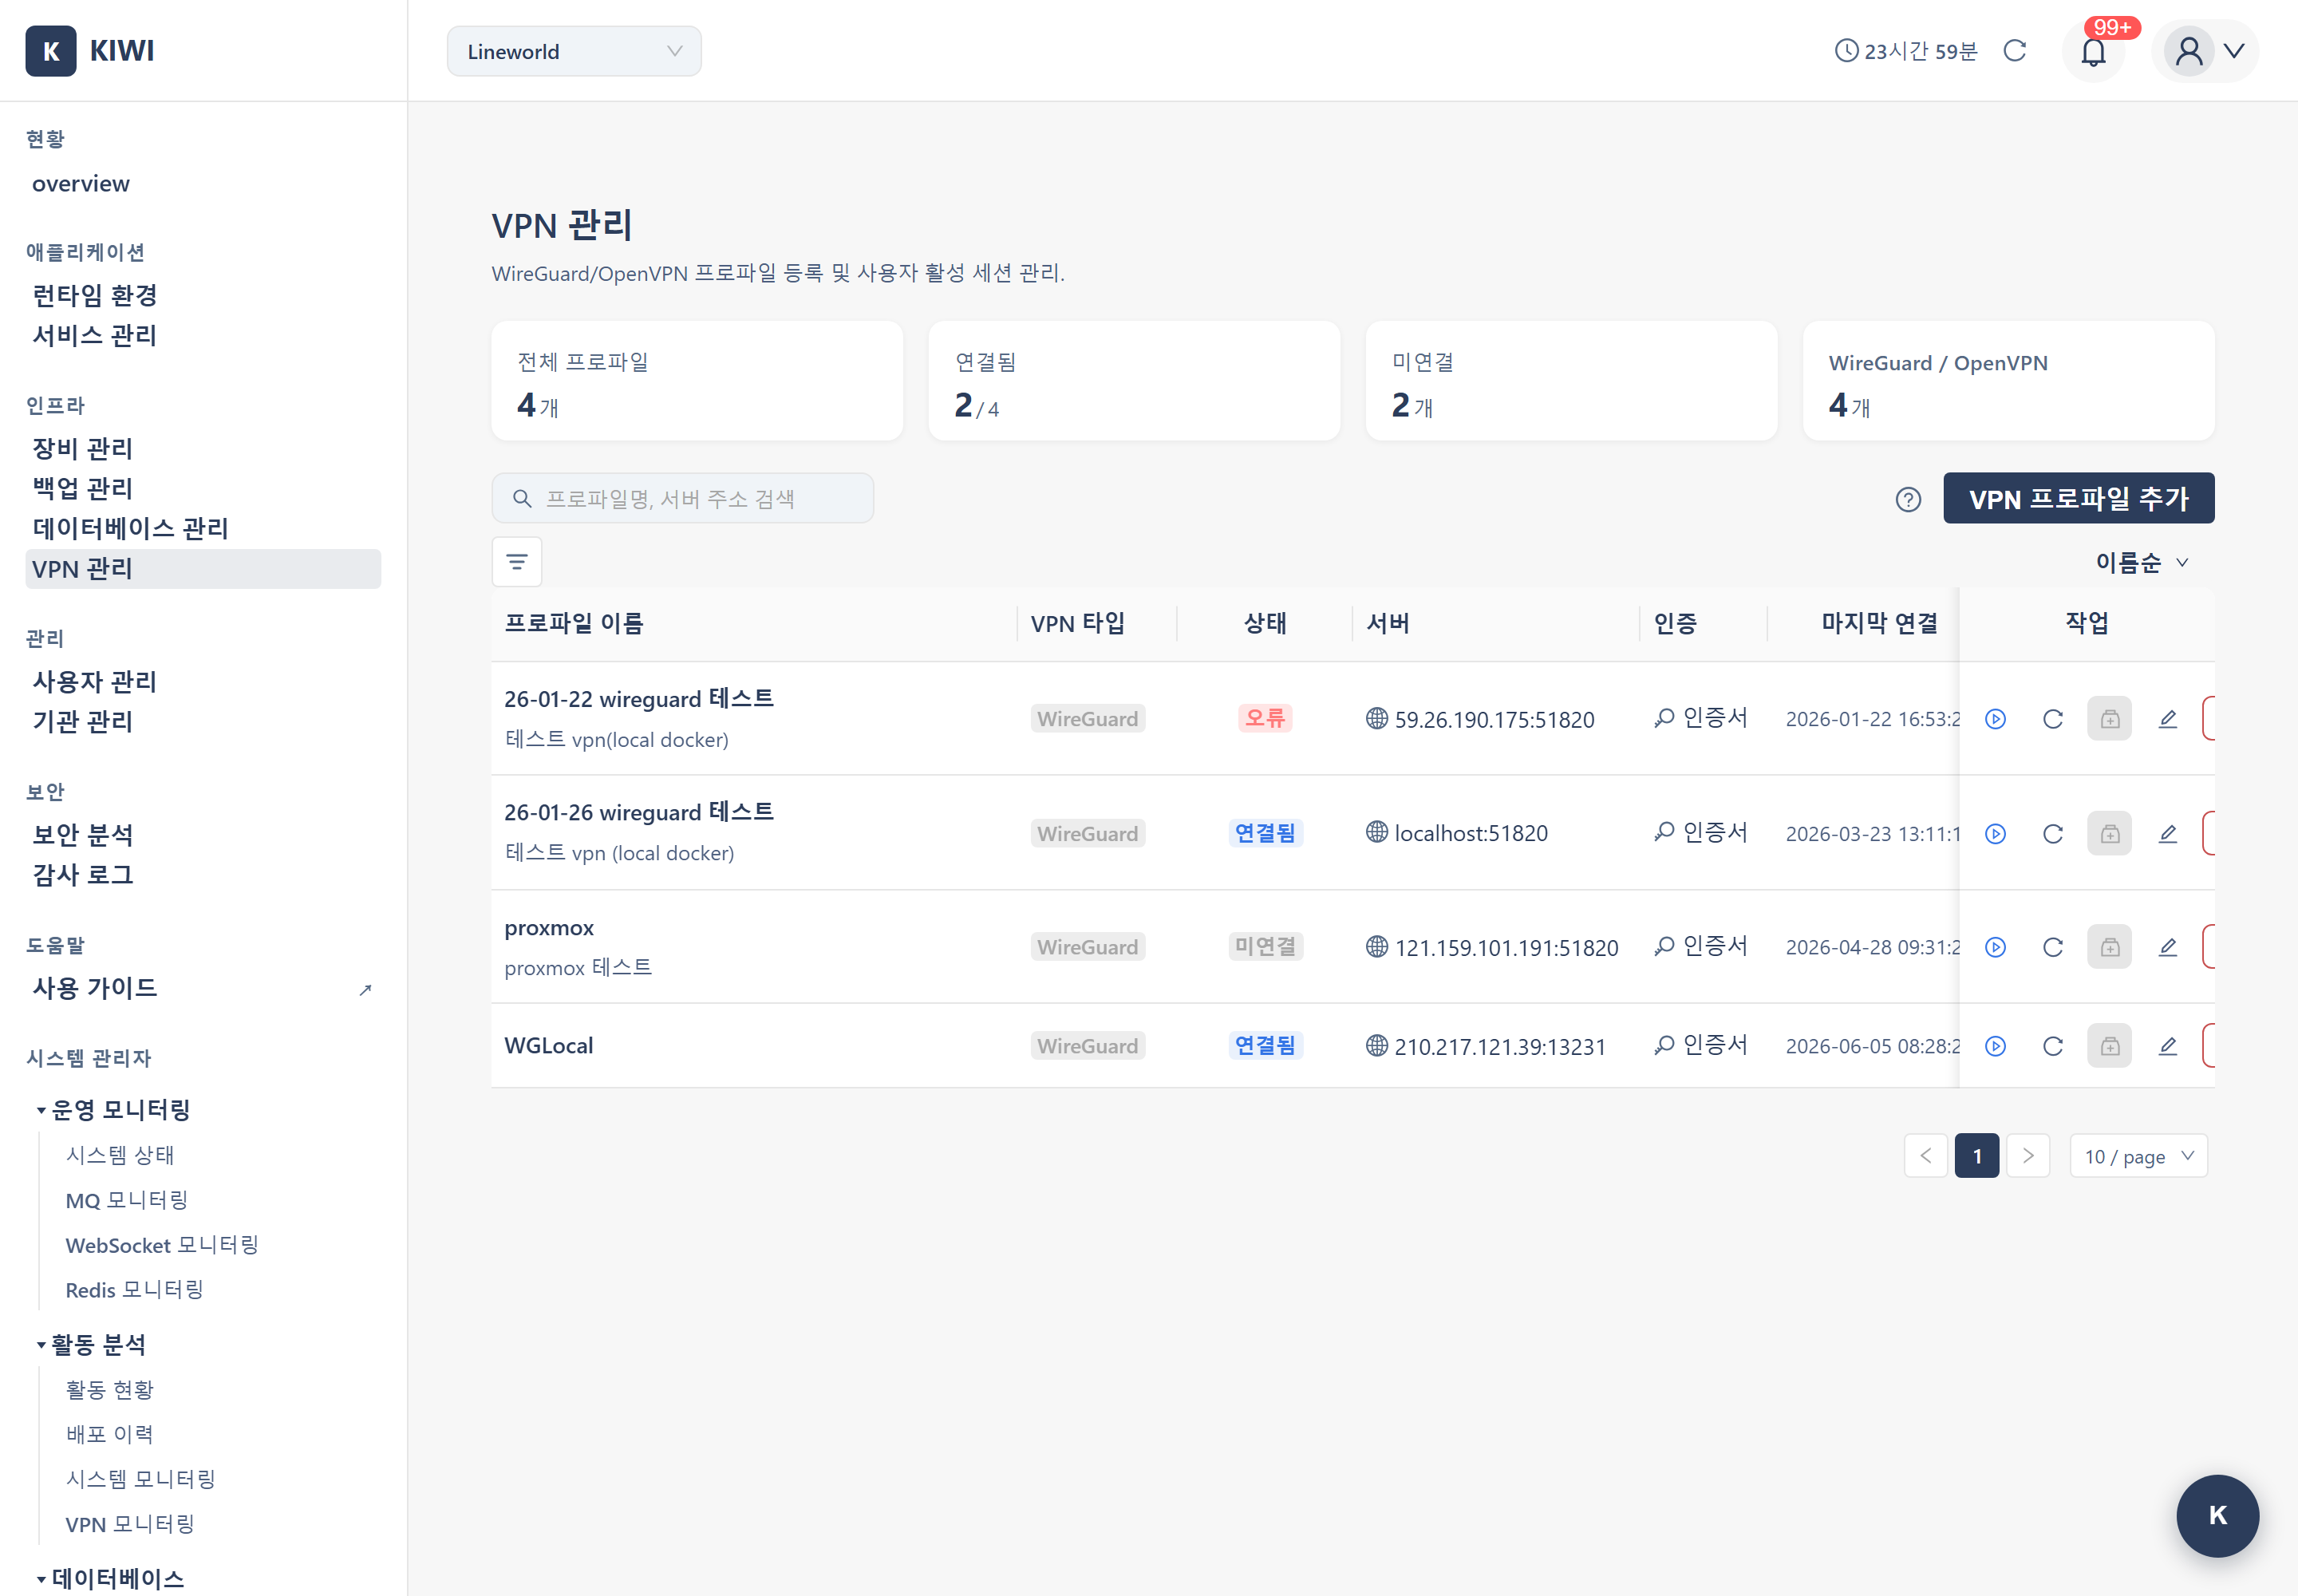
Statistics Cards
Four statistics cards at the top of the page give an at-a-glance overview of VPN status.
- Total Profiles: Total number of registered VPN profiles.
- Connected: Number of currently active VPN connections.
- Disconnected: Number of profiles not connected.
- WireGuard / OpenVPN: Number of profiles by type.
Profile List
Registered VPN profiles are shown in a table with 7 columns. There is no "Linked Devices" column — VPN profile selection happens at task start time through the ConnectionSelectionModal.
- Profile Name: Name and description identifying the profile.
- VPN Type: WireGuard, OpenVPN.
- Status: Current status such as Connected, Disconnected, Connecting, Error. When a session is active, the assigned local IP (
localIp) is displayed next to the status tag. - Server: VPN server address and port.
- Auth: Authentication method used (Certificate, PSK, Username, etc.).
- Last Connected: Most recent connection time.
- Actions: Connect/Disconnect, Connection Test, Session Diagnostics (MedicineBoxOutlined icon), Edit, Delete buttons.
When no profiles exist yet, an empty-state screen guides you through the steps: register profile → test connection → connect session.
How to Use
1. Registering a VPN Profile
Here's how to register a new VPN connection.
Step 1: Start Adding Profile
- Navigate to the [VPN Management] page
- Click the Add VPN Profile button in the upper right corner.
Step 2: Enter Basic Information
- Profile Name (Required): An identifiable name. Example: "Dev Server VPN"
- VPN Type (Required): Currently only WireGuard is supported.
- Description (Optional): Description of the profile. Example: "For dev team internal network access"
Step 3: Enter Server Information
- Server Address (Required): IP or domain of the VPN server. Example: vpn.example.com
- Port (Required): VPN server port. Default for WireGuard is 51820.
- WireGuard: 51820
- OpenVPN: 1194
- IPSec: 500
Ports may vary depending on VPN server configuration, so check with your administrator.
Step 4: WireGuard Key Settings
WireGuard uses public key cryptography. You can either copy the values from your client configuration file (.conf) or have KIOPS generate a keypair for you.
- Auto-generate keypair: Click the Generate Keys button and KIOPS immediately generates a WireGuard private/public keypair and fills in the form. Copy the generated public key separately so you can register it as a peer on your VPN server.
- Private Key (Required): The client's secret key. If entered manually, use the PrivateKey value from the [Interface] section.
- Peer Public Key (Required): The VPN server's public key. Enter the PublicKey value from the [Peer] section.
- PSK (Optional): Pre-shared key for additional security. Enter the PresharedKey value from the [Peer] section if present.
[Interface]
PrivateKey = 0HnoZ8QFjhjkqS707ZfTZSErFOs02B9QFcGqVBPGO2Y=  # ← Private Key
Address = 10.13.13.2/32

[Peer]
PublicKey = 4uGS1h6VhsWuQCEuVmqUu8X3fov5ziWXmhSFG9l1UR4=  # ← Peer Public Key
PresharedKey = k+biOyIx8IEEnGDbjATWKpSIEMKsVMlCdV6ofYYwbKQ=  # ← PSK (Optional)
Endpoint = vpn.example.com:51820
AllowedIPs = 10.13.13.0/24
Step 5: Network Settings (Optional)
- Allowed IPs: IP ranges to route through the VPN. Example: 10.13.13.0/24, 10.100.0.0/24
- Keepalive (seconds): Packet transmission interval to maintain connection in NAT environments. Default of 25 seconds is recommended.
Step 6: Save Review your settings and click the Add button.
2. Connecting VPN
How to connect to VPN using a registered profile.
- Find the profile you want to connect to in the profile list.
- Click the Connect button (play icon) on that row.
- When the connection succeeds, the status changes to Session Active and the assigned local IP is shown next to the status tag.
- Immediately after connecting, a setup guide modal automatically appears to walk you through follow-up steps such as routing checks and internal service connectivity tests.
- You can now access that VPN network.
- Make sure your internet connection is working.
- Verify the VPN port is not blocked by firewall.
- Confirm the key information in the profile is correct.
If the connection appears active but internal resources are unreachable, click the Session Diagnostics button (MedicineBoxOutlined icon) in the Actions column. It analyzes the handshake state, interface info, and routing table to help pinpoint the issue.
3. Disconnecting VPN
How to terminate an active VPN connection.
- Find the connected profile (Session Active status) in the profile list
- Click the Disconnect button (stop icon) on that row
- When disconnected, status changes to Disconnected
4. Testing Connection
Verify that profile settings are correct before actual connection.
- Click the Test button (refresh icon) on the profile you want to test
- A test modal opens and connection verification proceeds.
- Check the test result:
- Success: Profile settings are correct and connection is possible.
- Failure: Check the error message and modify settings.
5. Selecting a VPN at Task Start Time
VPN profiles are picked at task start time through the ConnectionSelectionModal (used when running device/deploy/command-execution tasks). There is no separate UI for pre-binding devices to a profile. Once a VPN profile is registered, it appears as an option in the connection selection modal whenever you start a task.
6. Editing Profile
Change settings of an existing profile.
- Click the Edit button (pencil icon) on the profile you want to modify
- Change the necessary information in the profile edit modal.
- Click the Edit button to save.
Profiles currently connected to VPN cannot be edited. Disconnect first, then edit.
7. Deleting Profile
Remove profiles that are no longer needed.
- Click the Delete button (trash icon) on the profile you want to remove.
- Click Delete in the confirmation dialog
- Profile is deleted.
- Connected profiles can also be deleted, but the connection will be terminated immediately.
- Deleted profiles cannot be recovered.
Connection Status
Explanation of VPN profile statuses.
- Session Active (Blue): Currently connected to VPN. You can access that network.
- Connected (Blue): Connection to server is available. Starting a session will connect immediately.
- Connecting (Orange): Connection is being attempted. Please wait.
- Disconnected (Gray): Not connected. Click the connect button to connect.
- Error (Red): A problem occurred with the connection. Check settings and try again.
Permission Description
Permissions required for VPN management.
- vpn:create: Can create new VPN profiles.
- vpn:update: Can modify existing profiles.
- vpn:delete: Can delete profiles.
- vpn:connect: Can perform VPN connect/disconnect
- vpn:test: Can run connection tests.
Buttons for features you don't have permission for are disabled or not displayed. Request necessary permissions from your organization administrator.
Troubleshooting
Connection Failed
- Check server address/port: Verify VPN server information is accurate.
- Check key information: Verify private key and peer public key are correct
- Check firewall: Ensure VPN port (default 51820) is allowed in firewall
- Check network: Ensure internet connection is working.
Connected but Cannot Access Internal Systems
- Check Allowed IPs: Verify the IP range you're trying to access is included in Allowed IPs
- Check routing: Verify routing to that range is configured on VPN server.
- Check internal firewall: Verify access from VPN range is allowed in internal system firewall
Connection Frequently Drops
- Keepalive setting: Set Keepalive to 25 seconds in NAT environments.
- Network condition: Drops may occur in unstable network environments.
- Server status: Check VPN server status with your administrator
Glossary
Simple explanations for terms you may encounter for the first time.
- VPN (Virtual Private Network): Technology for securely connecting to private networks through public networks.
- WireGuard: A fast and modern VPN protocol. High security due to its concise code.
- Peer: The other party in a VPN connection. From the client's perspective, the server is the peer.
- Public/Private Key: Key pair used for encryption. Never share the private key; the public key is shared with the other party.
- PSK (Pre-Shared Key): A pre-shared secret key for additional security.
- Allowed IPs: IP ranges to transmit through the VPN tunnel. Only traffic to these ranges goes through VPN.
- Keepalive: Packets sent periodically to maintain connection in NAT environments.
- NAT (Network Address Translation): Technology that converts private IPs to public IPs. Used in most home/office networks.
Best Practices
Recommendations for safe and efficient VPN management.
- Key Management: Keep private keys secure and never share them.
- Regular Renewal: Renew keys periodically for security.
- Minimum Privilege: Add only necessary IP ranges to Allowed IPs
- End Connection: Disconnect VPN when not in use
- Profile Naming: Use clear names that indicate purpose (e.g., "DevServer-VPN", "DBServer-Access")
- Write Descriptions: Record purpose and connection targets in profile description.
- Test First: Run connection test after registering new profiles.
- Use Session Diagnostics: If the connection looks active but internal resources are unreachable, use Session Diagnostics to inspect the handshake and routing.
Related Guides
- Device Management - Device registration and management.
- Permission Management - Permission settings and grants.