Secret Scan
What happens if an API key or password you accidentally committed remains in the Git repository? Secret scanning automatically detects exposed credentials across the source code and the entire commit history, letting you find problems before an attacker does.
A secret committed once remains permanently in the Git history, even if you delete it in a later commit. In a public repository, automated bots can collect and abuse the key the moment it is exposed. Secret scanning inspects not only the current code but also past commits to find these risks.
Overview
- Analysis target: Source code and the entire commit history of a Git repository
- Analysis engine: Gitleaks
- Analysis basis: Gitleaks regular expression rule sets (API key, token, password patterns)
- Detected value handling: Detected secrets are masked when displayed and stored; the originals are not stored
Secret scanning inspects not only the current files but the entire commit history. Therefore, secrets that were briefly committed and then deleted in the past are also detected.
Step 1: Entering the Secret Scan
- Click the [Security Analysis] menu under the "Security" group in the sidebar.
- Select a service to analyze from the card carousel at the top of the page.
- Select the Secret tab.
Entering /security?id={serviceId}&area=secrets opens the Secret tab for that service directly.
Step 2: Scan Input Items
The trigger bar at the top of the Secret tab uses the following items.
- Git repository URL (required): The repository URL to inspect
- Branch (optional, default
main): The branch name to inspect - Git token (optional, for private repos): A token with repository read permission
The Git URL, branch, and token can be registered in the Settings tab, shared across SAST/IaC/Secret. Once registered there, they are used automatically for secret scans.
If you do not enter a Git token directly, the backend automatically uses the token stored in the Settings tab or in the organization settings.
Step 3: Running the Scan
When you click the Start Scan button, Gitleaks clones the repository and inspects the code and commit history. Progress is shown in real time via WebSocket.
Gitleaks uses regular expression rule sets to detect the following secret patterns.
- Cloud service access keys (AWS, GCP, Azure, etc.)
- API keys and tokens (GitHub, Slack, Stripe, etc.)
- Passwords, database connection strings
- Private keys (PEM, SSH keys, etc.)
When the scan completes, the result screen updates automatically.
Step 4: Reviewing Results
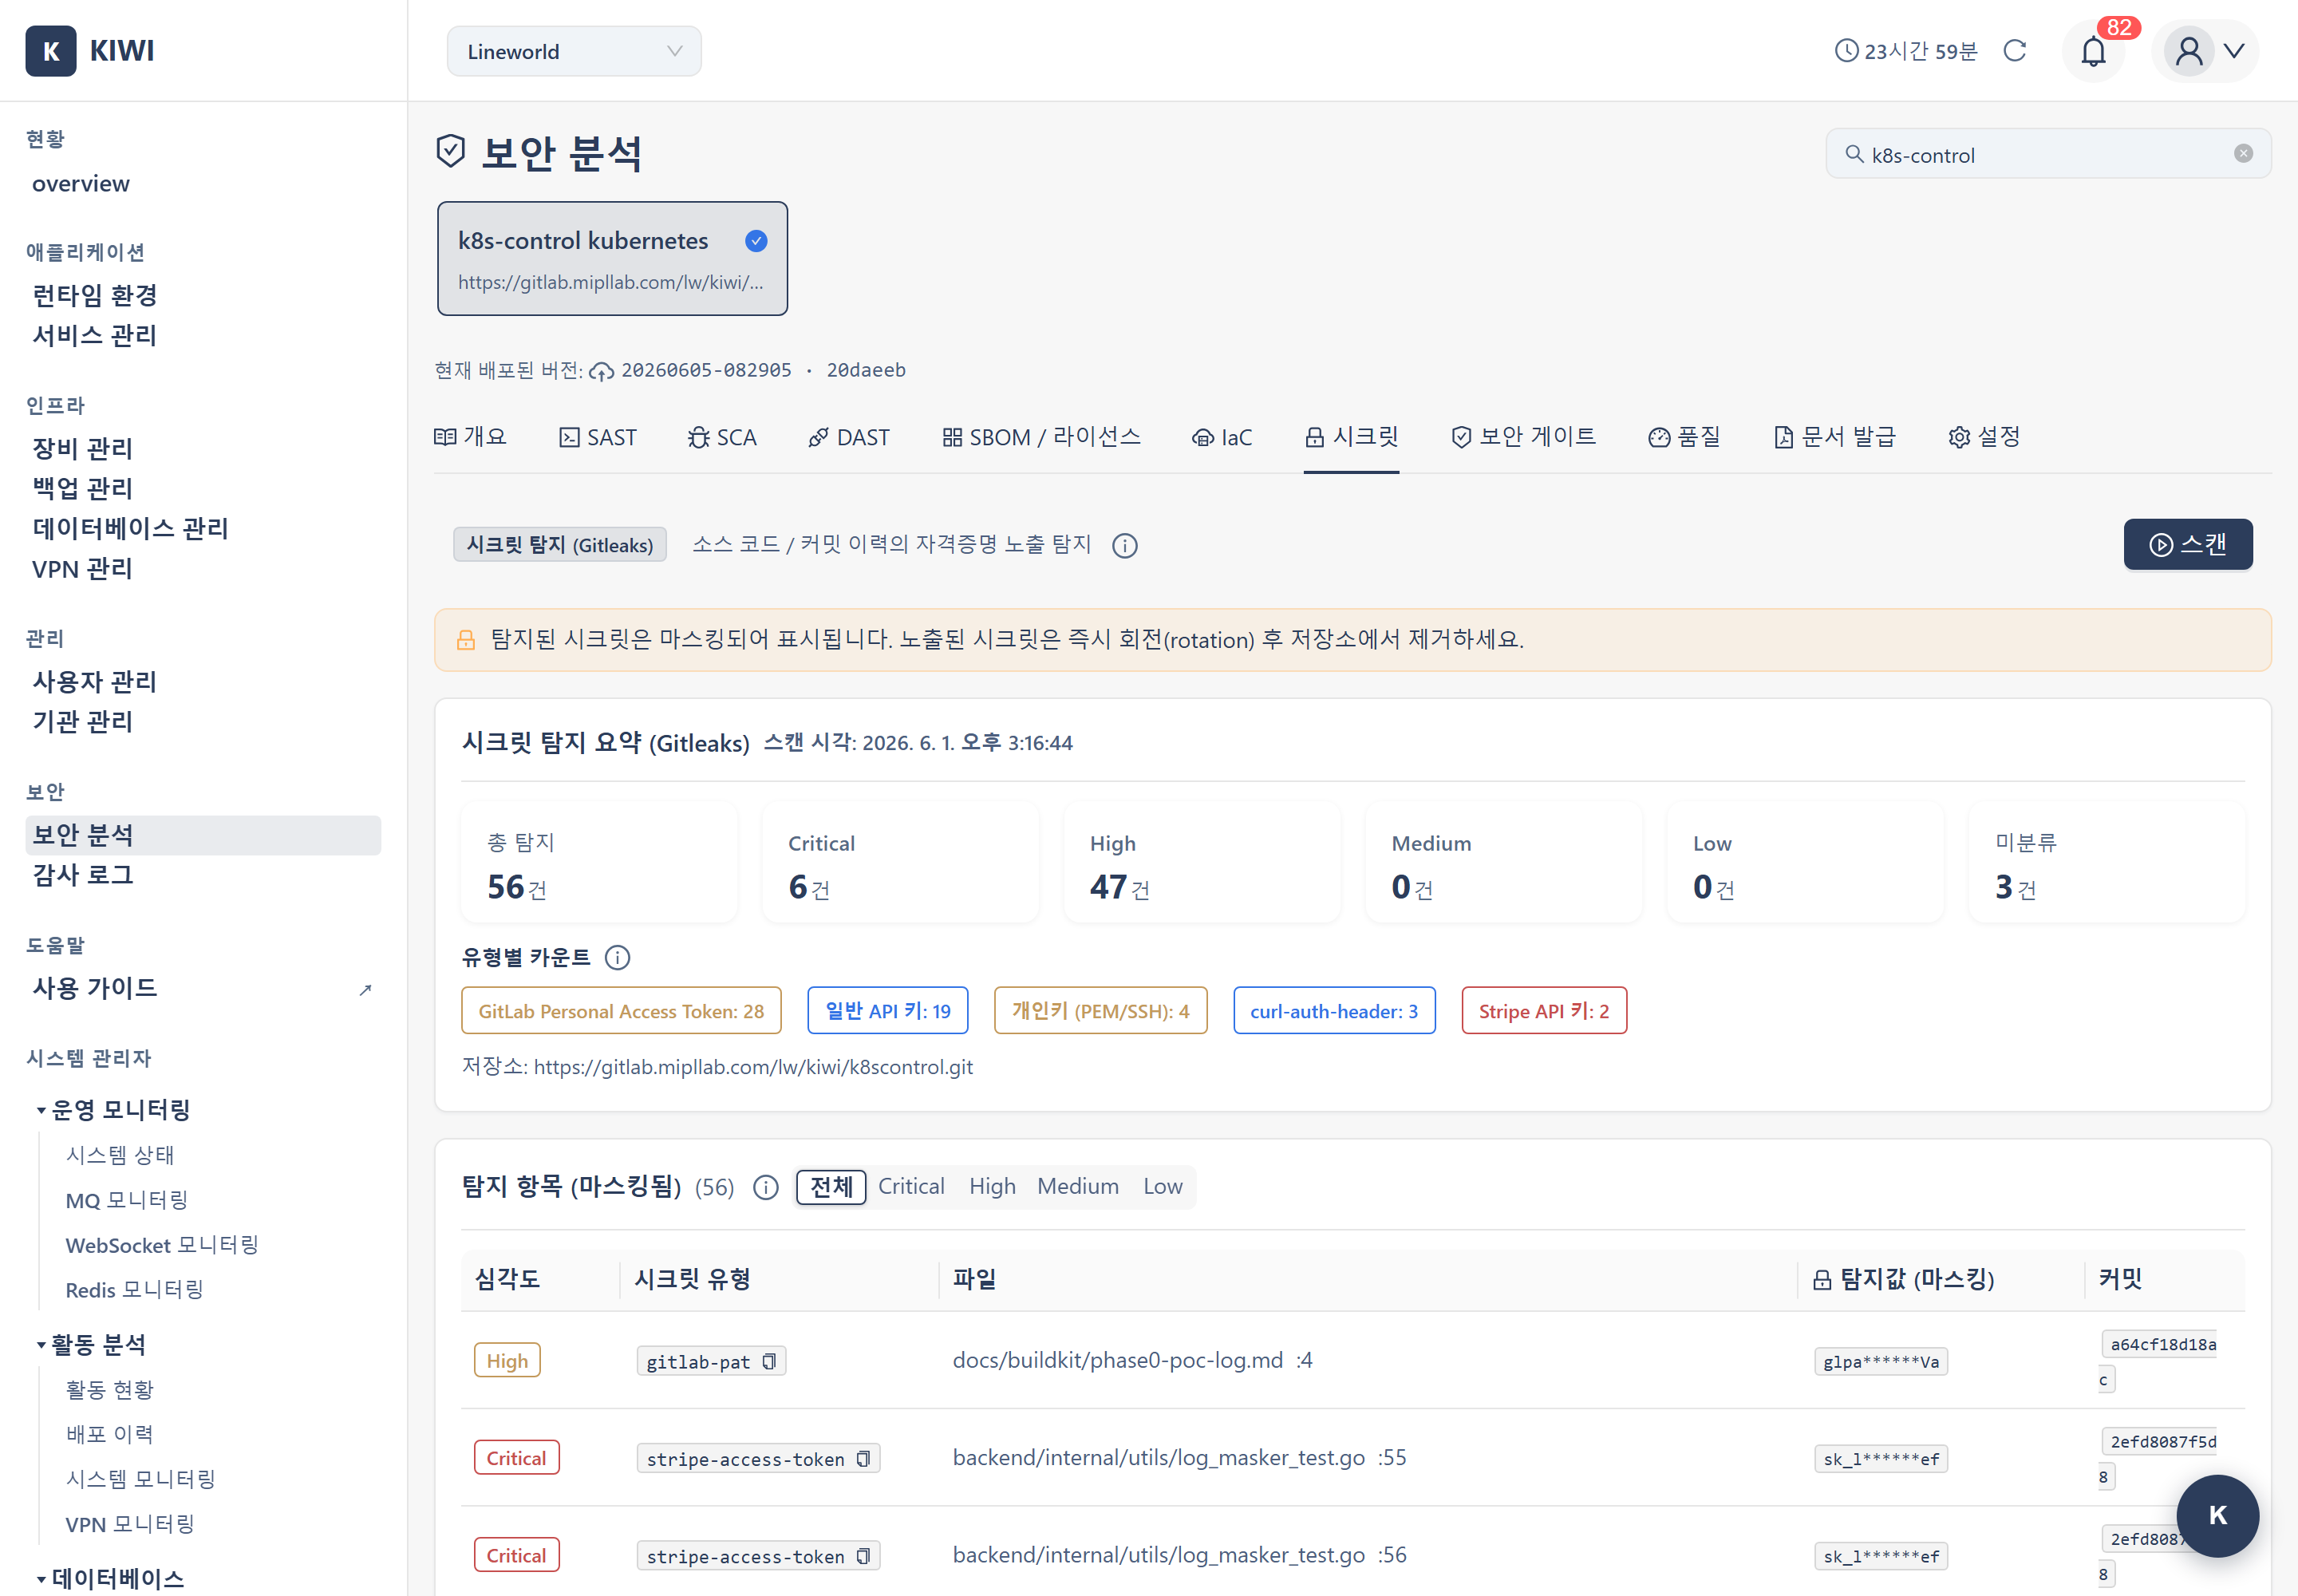
4.1 Result Summary
When the scan completes, you can review the following.
- Total detections: The total number of exposed secrets found
- By type: The type of each detected secret (API key, token, password, etc.) (unmapped items are shown as "Unclassified")
- Severity breakdown: The distribution of detected secrets by severity (Critical/High/Medium/Low/Unknown) — items with unconfirmed severity are classified as Unknown.
- The inspected repository URL and scan time
4.2 Detected Item Details
For each detected item, you can review the following.
- Location: The file path and commit where the secret was found
- Secret type: The type of the detected credential
- Masked detected value: The secret value is shown masked (the original is not stored)
4.3 Scan History
The Scan History table on the Secret tab lets you review credential exposure trends over time. Since results accumulate with each scan, you can track your security improvements chronologically.
- Scan time: When each scan was executed
- Critical/High/Medium/Low: Number of detections per severity level
- Total detections: Cumulative detection count with change from previous scan (▲/▼)
- Viewing: Marks which point-in-time is currently displayed in the results area
Click a row in the history table to display that scan's detailed results (list of detected secrets) in the results area. This lets you accurately confirm which credentials were exposed at a specific point in time.
Responding to an Exposed Secret
When a secret is confirmed to be exposed, respond in the following order.
-
Revoke and rotate immediately: Erasing an exposed key/token from the code is not enough. Immediately revoke the credential at the issuing provider and replace it with a new value.
-
Remove from the code: Do not write the new value directly in the code; inject it via environment variables or a secrets management tool.
-
Consider cleaning up history: Secrets remaining in the commit history do not disappear with a code fix alone. Consider rewriting history if needed, but if the key is already revoked, this is a lower priority.
Even if you delete a secret in a commit, it remains in earlier commits. The most reliable response is to revoke the exposed credential itself and issue a new one.
Preventing Secret Exposure
- Use environment variables: Inject credentials via environment variables or a secrets management tool, not in the code.
- Use
.gitignore: Register files containing secrets, such as.envand key files, in.gitignore. - Check before committing: Build the habit of checking for secrets at the pre-commit stage.
- Scan regularly: Run secret scans regularly to quickly find newly introduced exposures.
Troubleshooting
Scan Failure
-
Cannot access code: Check that the Git token has repository read permission. The token stored in the Settings tab or organization settings is used automatically.
-
Timeout: Repositories with a very long commit history may take a long time to inspect. Limit the analysis scope to a specific branch.
False Positives
Dummy test keys or example values may be detected as secrets. Verify whether a detected item is an actual credential, and if it is a dummy value, leave a clear example marker in the code to reduce confusion.
Related Guides
- SAST Scan - Static source code analysis (including hardcoded credentials)
- IaC Scan - Infrastructure code misconfiguration analysis
- Security Gate - Combined deployment verdict across 6 areas